


Welcome to our comprehensive guide, where we’re excited to share detailed instructions on how to build a bed in a van, perfectly suited to your van lifestyle!
Calling all DIY enthusiasts – we’ll walk you through the step-by-step process of DIY van bed build, and we’ve got plenty of Sprinter van bed ideas to spark your creativity. Plus, we’ve included van life bed ideas that’ll work wonders for other vans too.
If you prefer a ready-to-use bed solution, we invite you to visit our store and explore our van bed offerings.
Let’s get started on making your van dreams a reality!
CONVERSION Van bed ideas
Looking to deck out your camper van with the perfect bed? Let’s narrow down your options with a few questions.
- First up, what size is your van? Knowing your space constraints will help determine which bed types will fit best.
- Next, how many people will be sleeping in the van? This will guide you towards beds that accommodate your crew comfortably.
- Are you on the taller side? Consider the maximum bed length you’ll need for a good night’s sleep.
- Planning to transport bikes or other equipment? Opt for beds with storage solutions or that can easily be folded away.
- Lastly, are you leaning towards a DIY project or prefer buying a ready-made bed?
- Are you planning to install van flares or capsules? Learn more about camper van flares or capsules to maximize your van’s space and functionality.
Once you’ve answered these questions, you’ll be well on your way to choosing the perfect camper van bed that ticks all your boxes.
Checkout below the most popular camper van bed ideas:
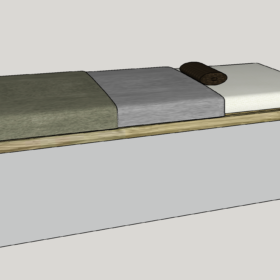
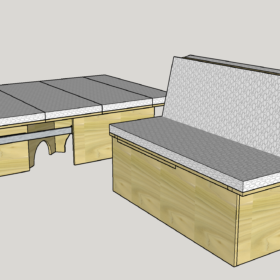
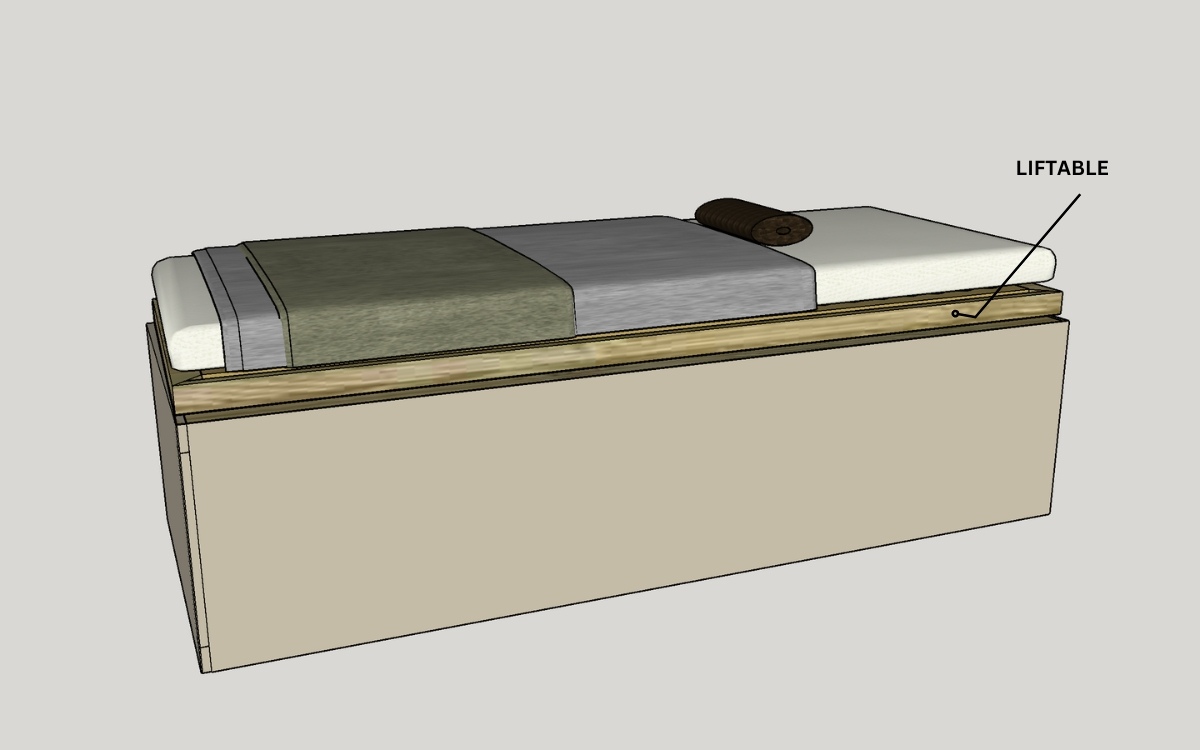
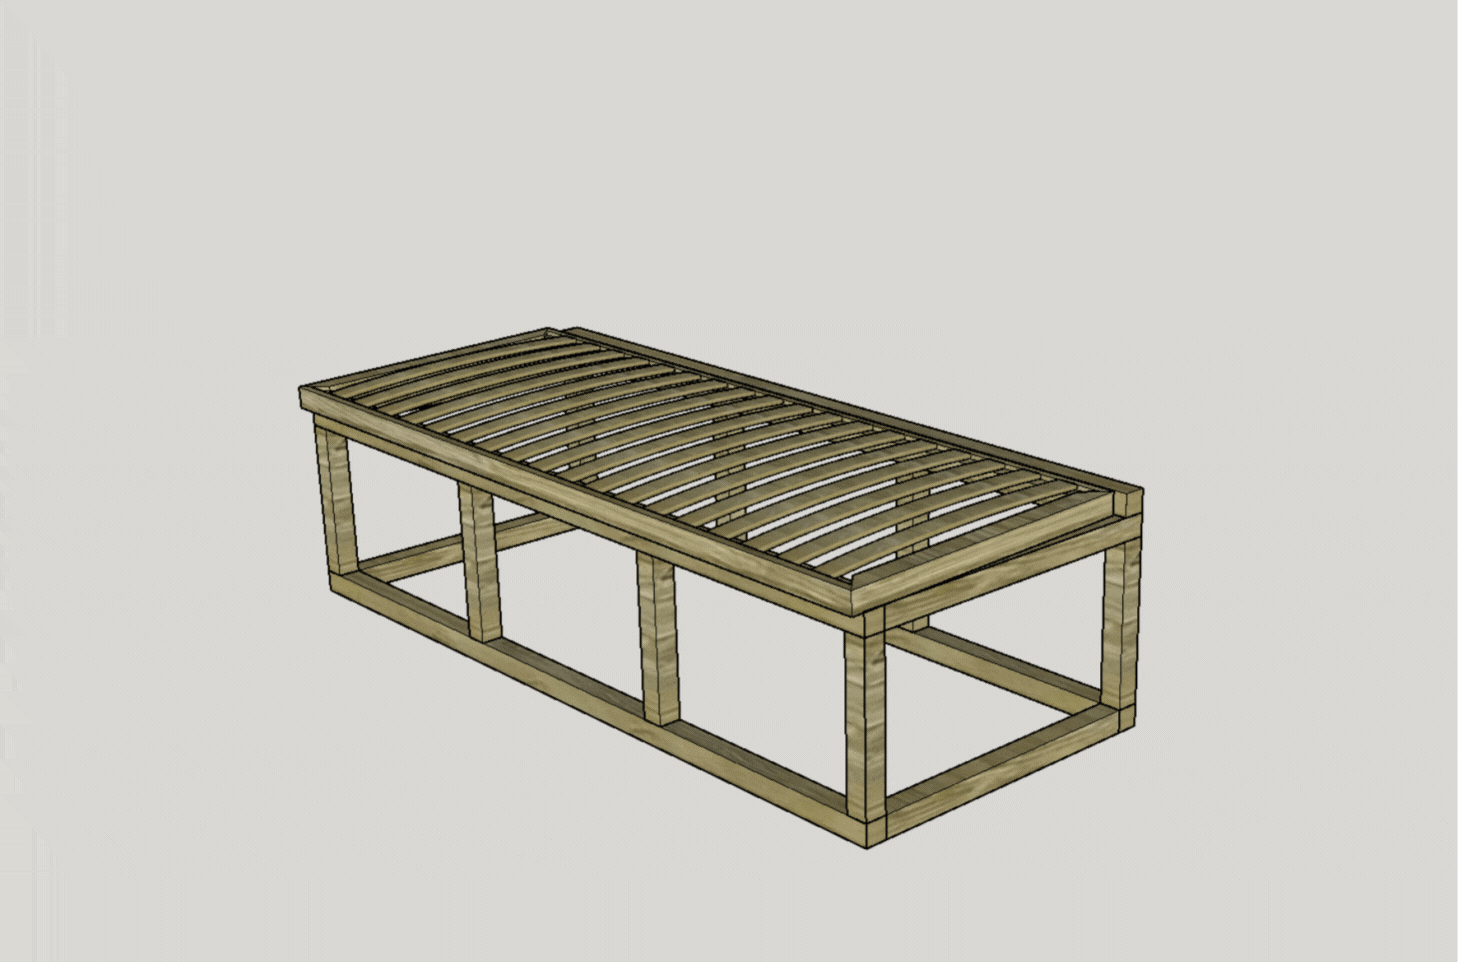
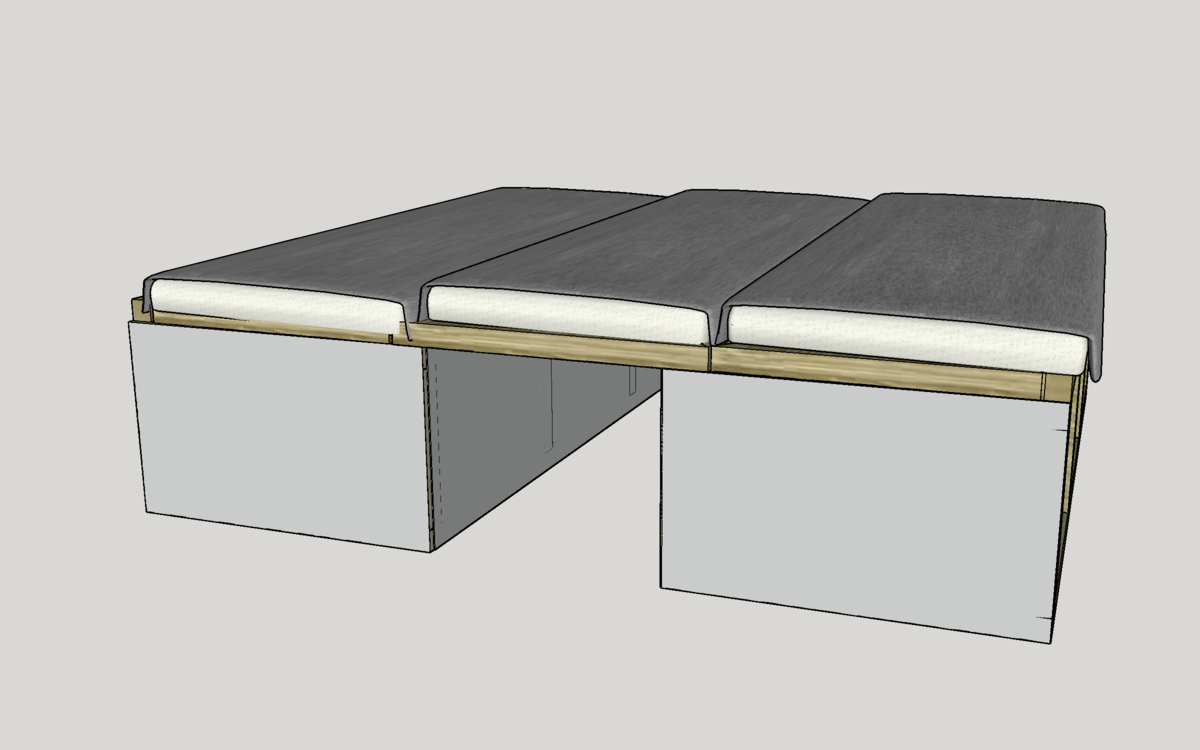
van bench seat bed
DIY Potential: Converting a cargo van bench seat into a bed is a relatively straightforward DIY project, especially for those with basic carpentry skills. It involves adding a platform or extending the bench to create a flat sleeping surface.
Pros:
- Simplicity: Converting a bench seat into a bed is simpler compared to building a rock and roll bed, requiring fewer structural alterations.
- Cost-Effective: DIY bench seat beds are often more budget-friendly than purchasing pre-made solutions, as they utilize existing van seating.
- Space Utilization: By transforming the bench seat for cargo van, you maximize space efficiency in the van, providing a comfortable sleeping area without sacrificing seating during the day.
- Versatility: The bed can easily be converted back into seating when needed, offering flexibility for various van configurations.
Cons:
- Comfort: Depending on the original bench seat design, comfort may be compromised compared to purpose-built beds with mattress support systems.
- Limited Size: The size of the bed is constrained by the dimensions of the original bench seat, which may not provide ample space for taller individuals or multiple sleepers.
- Complexity of Conversion: While simpler than some other bed options, converting a bench seat into a bed still requires careful planning and execution to ensure a flat and stable sleeping surface.
- Storage Constraints: Unlike some other DIY camper van bed designs that incorporate storage solutions, bench seat beds may lack integrated storage options, requiring additional creative solutions for gear organization.
In summary, conversion van bench seat beds offer a relatively straightforward DIY solution for adding sleeping accommodations to a camper van, with the potential for cost savings and space optimization. However, considerations regarding comfort, size limitations, and storage should be taken into account when planning the conversion.
How to build a van bench seat bed
Building a van bench seat for Sprinter or any other van can be a practical and space-saving solution for turning your van into a comfortable camper. Below are the steps to create your own van bench seat bed:
Materials and Tools Needed:
Materials:
- Lumber (for framing)
- Plywood sheets (for the top and side)
- Hinges
- Screws and bolts
Tools:
- Saw
- Drill & hole saw
- Measuring tape
- Sandpaper
- Staple gun
- Safety goggles and gloves
Step 1: Measure and Plan
Measure the dimensions of your van’s interior to determine the size of the bench seat bed. Consider the space needed for other amenities such as storage, kitchenette, etc. Sketch out a design plan based on your measurements.
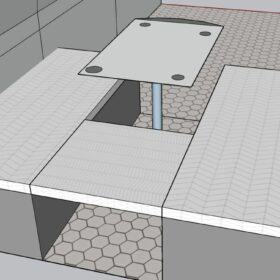
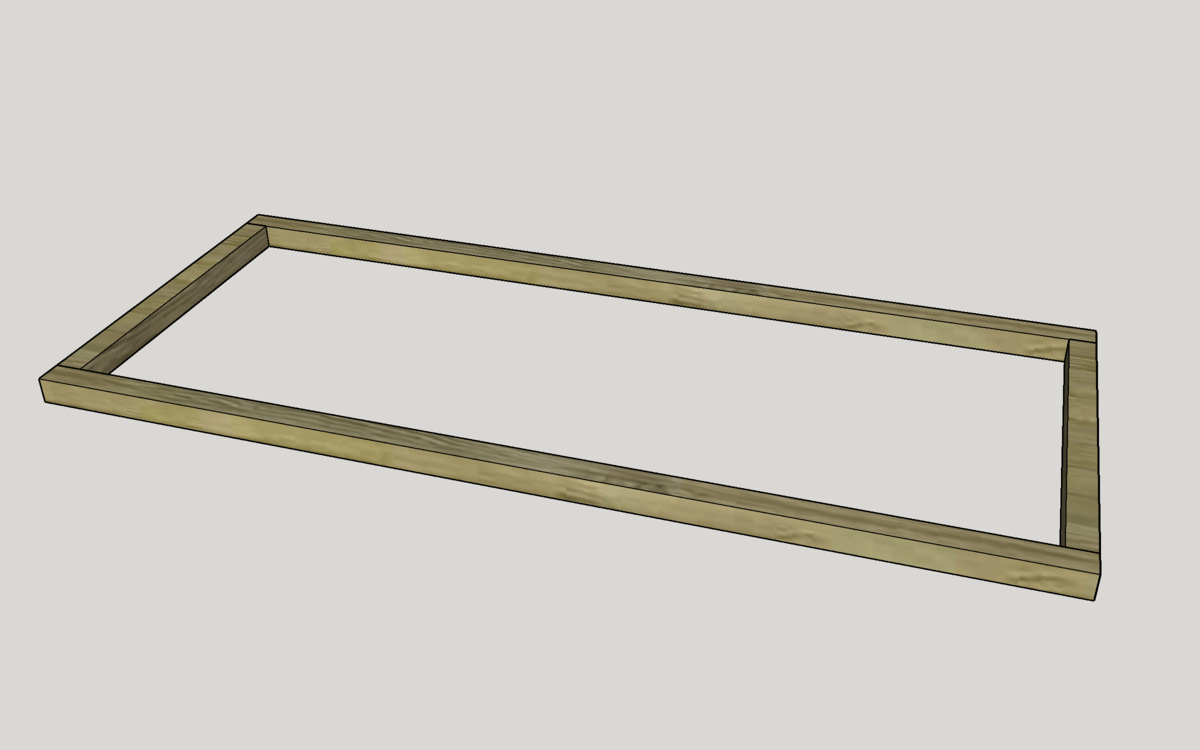
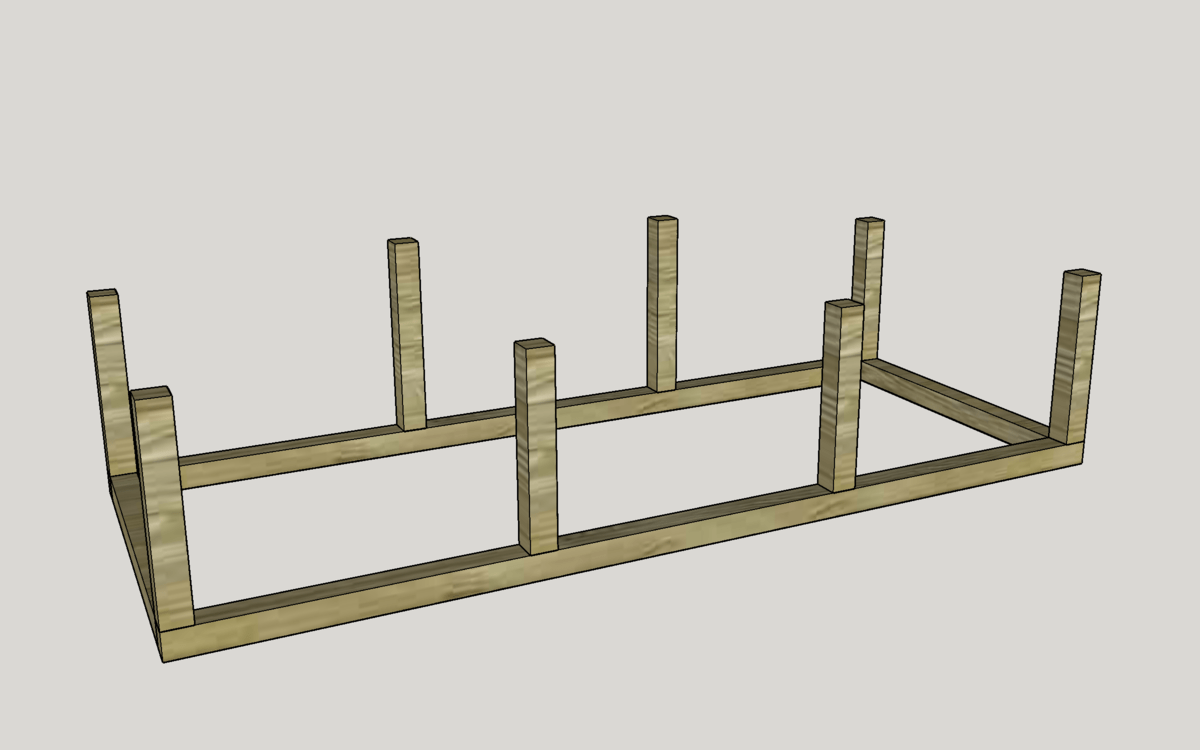
Step 2: Build the Frame
Using lumber, construct the frame for the bench seat and bed. Ensure the frame is sturdy enough to support the weight of sleepers. Attach the frame securely to the van’s floor and walls.
Step 3: Cut and Assemble the Top
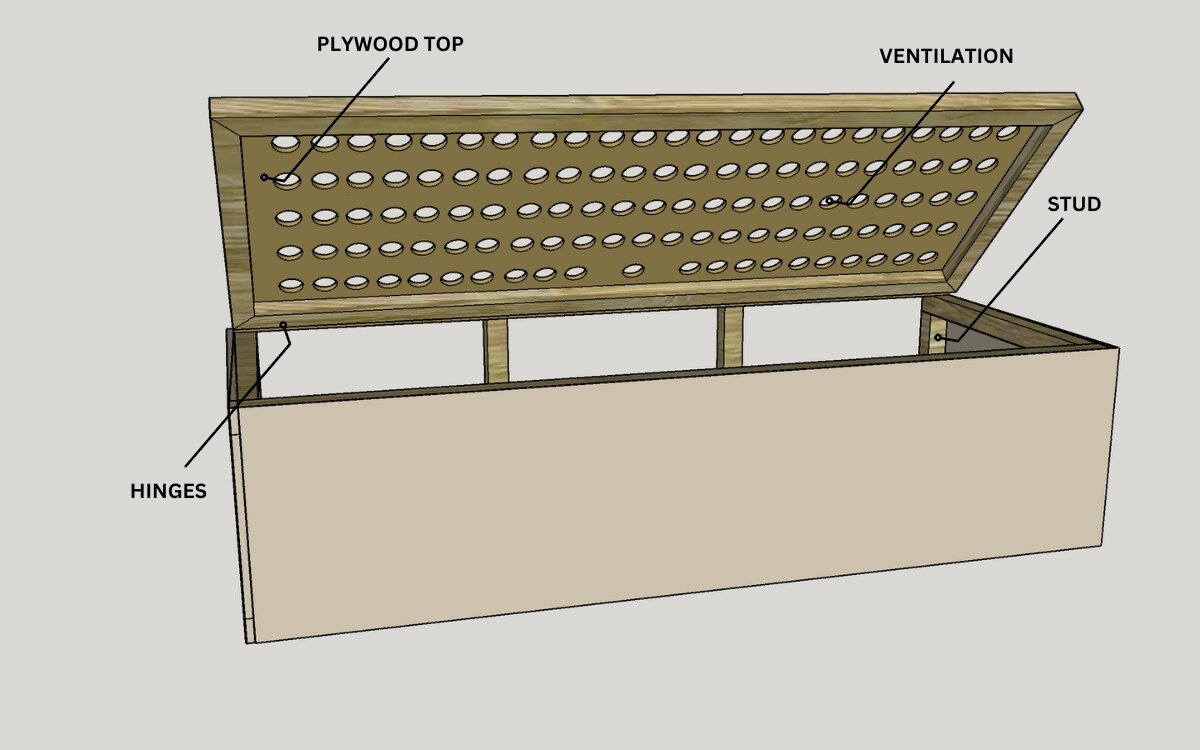
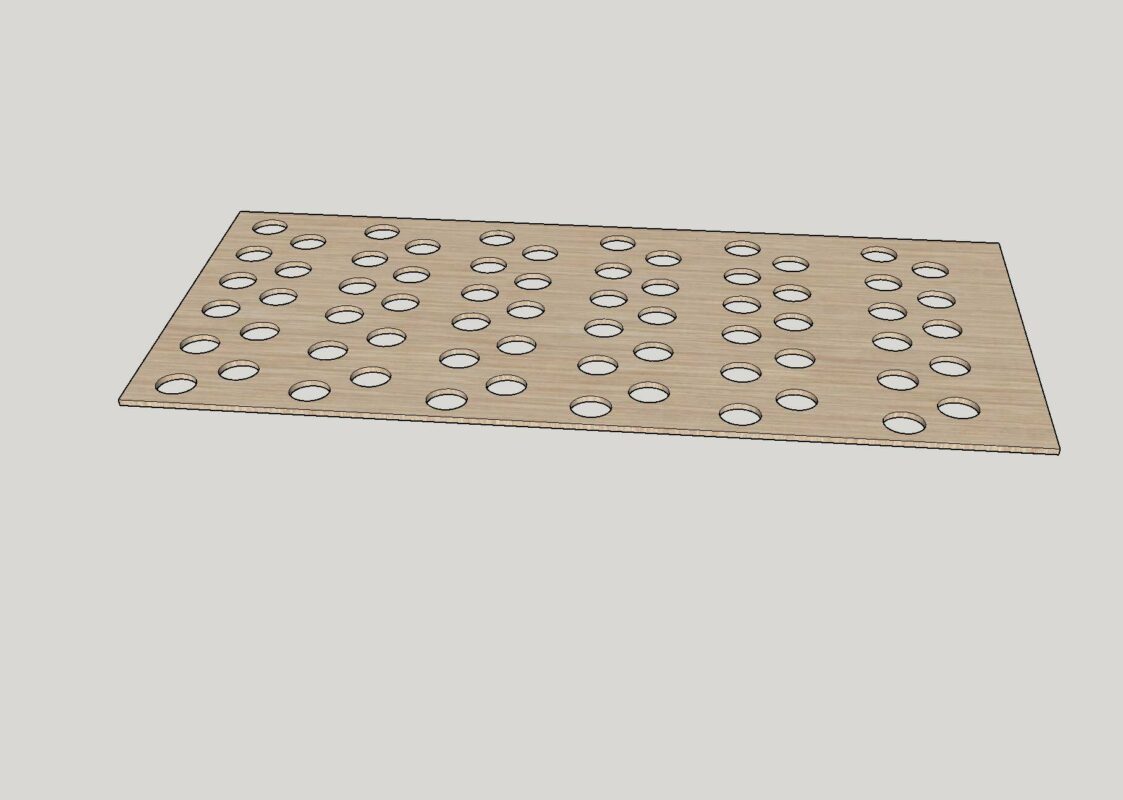
Gather studs to create the frame structure for the top of the bed.
Next – cut plywood sheets according to the dimensions of your frame.
Using the studs, construct the frame for the top surface. Position the studs along the edges of the plywood sheet, ensuring they are evenly spaced and securely attached. This frame will provide support and stability to the top surface, enhancing the durability of your bench seat bed.
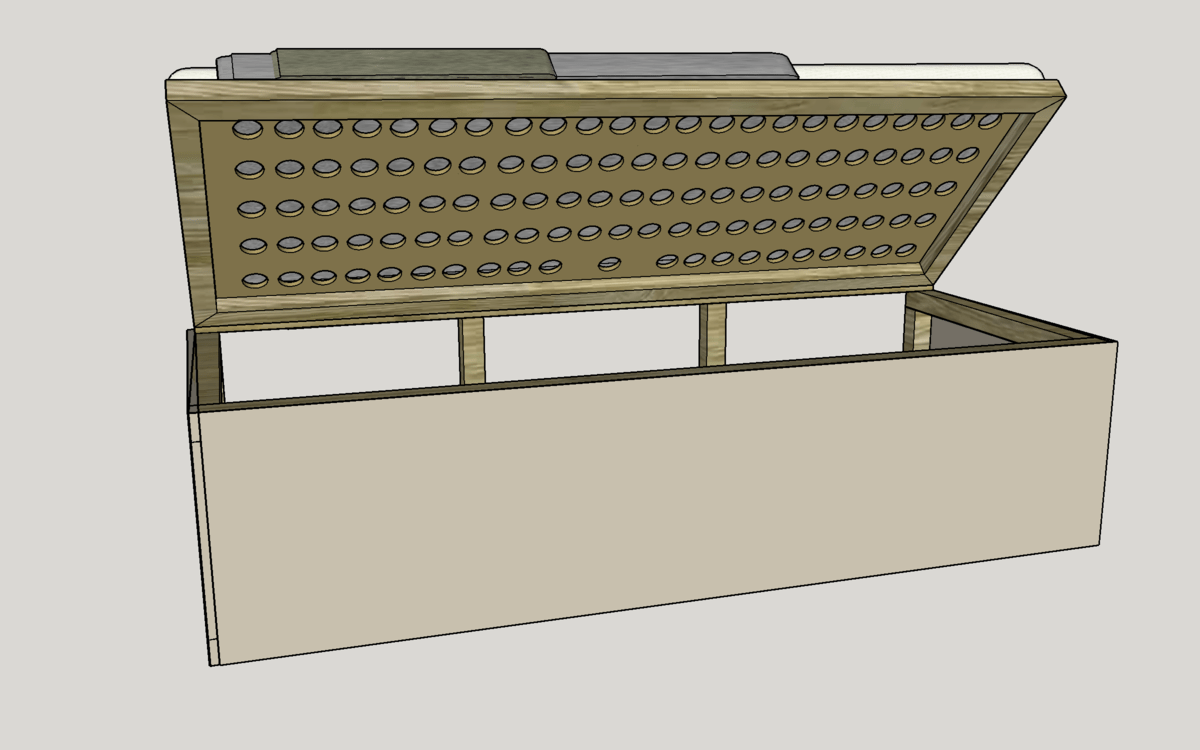
After assembling the frame, attach the plywood sheet securely on top. Using drill saw, make holes for a ventilation. This will also reduce the final weight of the bed.
Step 4: Attach Hinges
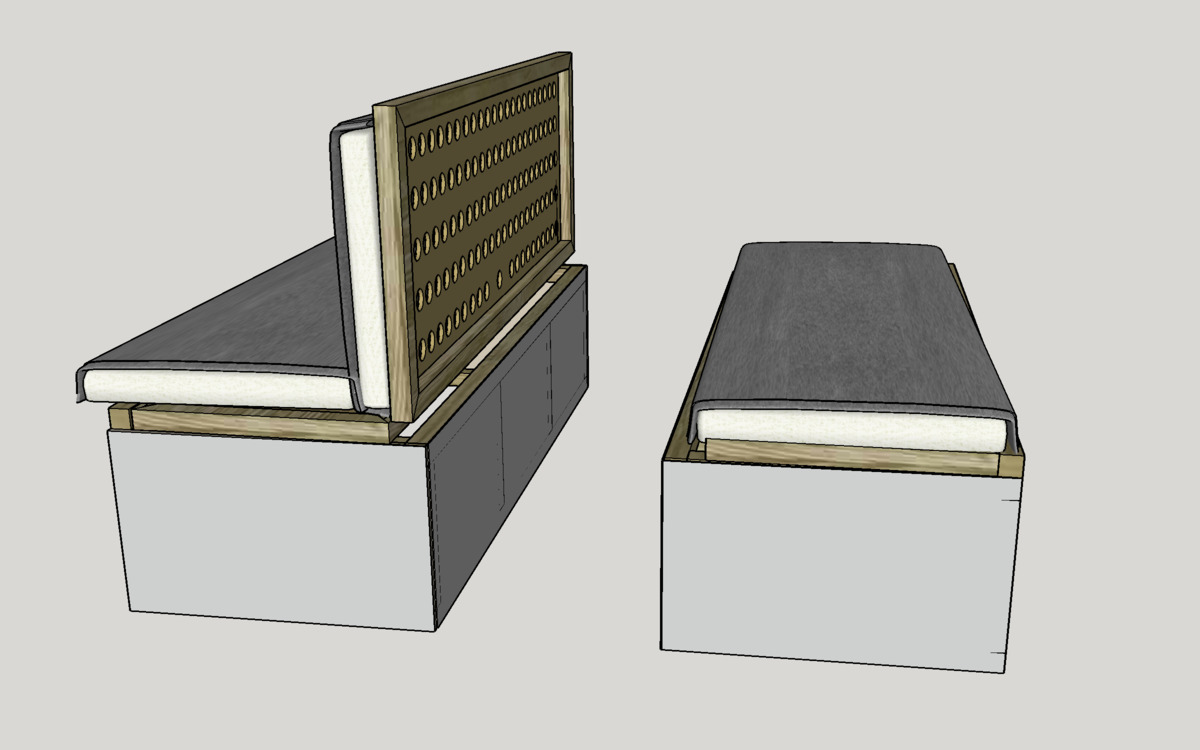
Attach hinges to the base of the bench seat and the top of the bed. This will allow to get access to the storage space beneath the bed, which can be utilized for storing various items.
Step 5: Cut and Assemble Plywood for the Sides
Cut plywood sheets to match the required dimensions for the sides of the frame, then securely attach them to the frame using screws to reinforce the structure of the bench seat bed
Step 6: Finishing Touches
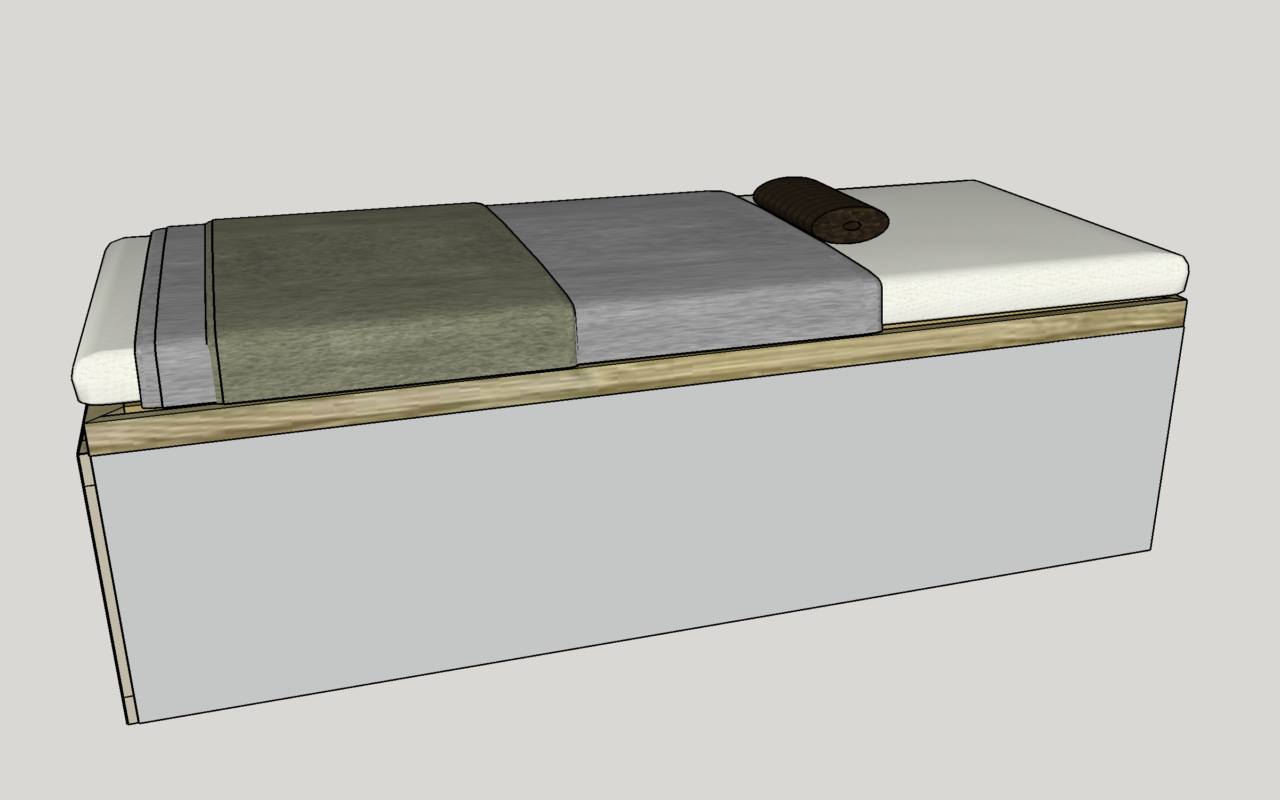
Add any additional features such as storage compartments under the bench seat. If desired, you can paint the sides of the frame to add a decorative touch or match your van’s interior design.
Step 7: Secure the Bench to the Floor of the Van
Once the bench seat bed frame is assembled and positioned in the desired location within the van, securely fasten it to the floor using appropriate hardware such as screws or bolts. Ensure that the bench seat bed is firmly anchored to the floor to prevent movement during travel and provide stability for occupants.
Step 8: Test and Adjust
Before hitting the road, test the bench seat bed to ensure it’s comfortable and functions as intended. Make any necessary adjustments to improve stability or comfort.
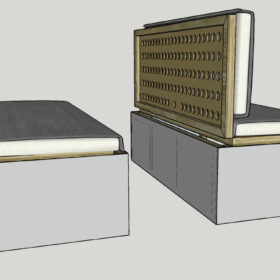
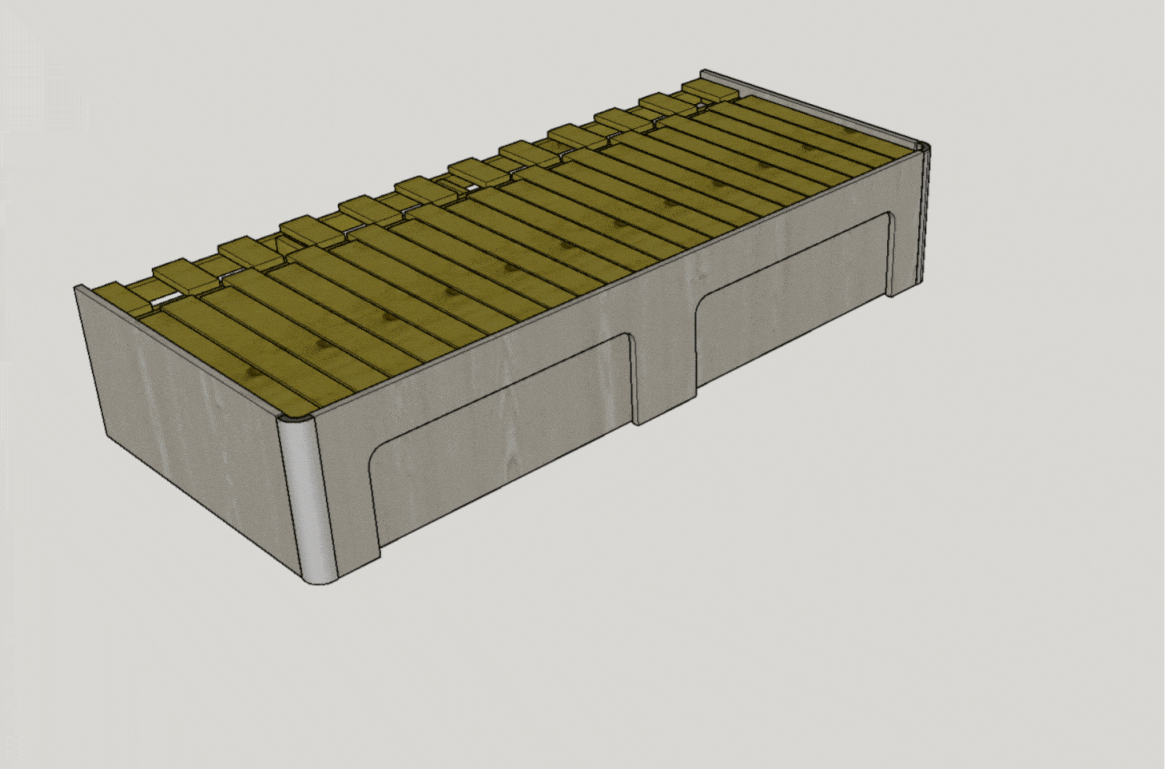
Van folding bed
There are many van folding bed ideas around Let’s talk about folding sofa bed.
DIY Potential: Building a diy foldable van bed can range from moderate to advanced DIY depending on the complexity of the design. It involves creating a frame that folds up against the wall or into a seating area during the day and unfolds into a bed at night.
Now let’s talk about pros and cons of the campervan folding beds:
Pros:
- Space Efficiency: Folding beds maximize space in the van by allowing the bed to be stored vertically or converted into a seating area when not in use.
- Versatility: During the day, the folded bed can serve as a seating or living area, providing flexibility in the van layout.
- Customization: DIYers have the freedom to customize the design and materials of the diy folding van bed to suit their preferences and van dimensions.
- Comfort: With the right mattress and support system, folding beds can offer comfortable sleeping arrangements similar to traditional beds.
Cons:
- Complexity: Building a folding bed requires advanced carpentry skills and knowledge of mechanical systems to ensure smooth operation and structural integrity.
- Time-Consuming: DIY folding beds can be time-consuming to design, build, and install, especially for those new to woodworking or mechanical engineering.
- Space Constraints: The design of the folding bed may limit storage options or require additional modifications to accommodate gear or equipment.
- Potential for Malfunction: If not properly constructed, folding beds may be prone to mechanical failures or instability, posing safety risks during use.
In summary, van folding beds offer a space-efficient and versatile solution for camper van conversions, but DIY construction requires careful planning, skill, and attention to detail to ensure functionality and safety. While they provide benefits such as space optimization and customization, potential drawbacks include complexity, time investment, and the need for mechanical expertise.
How to build a folding van bed
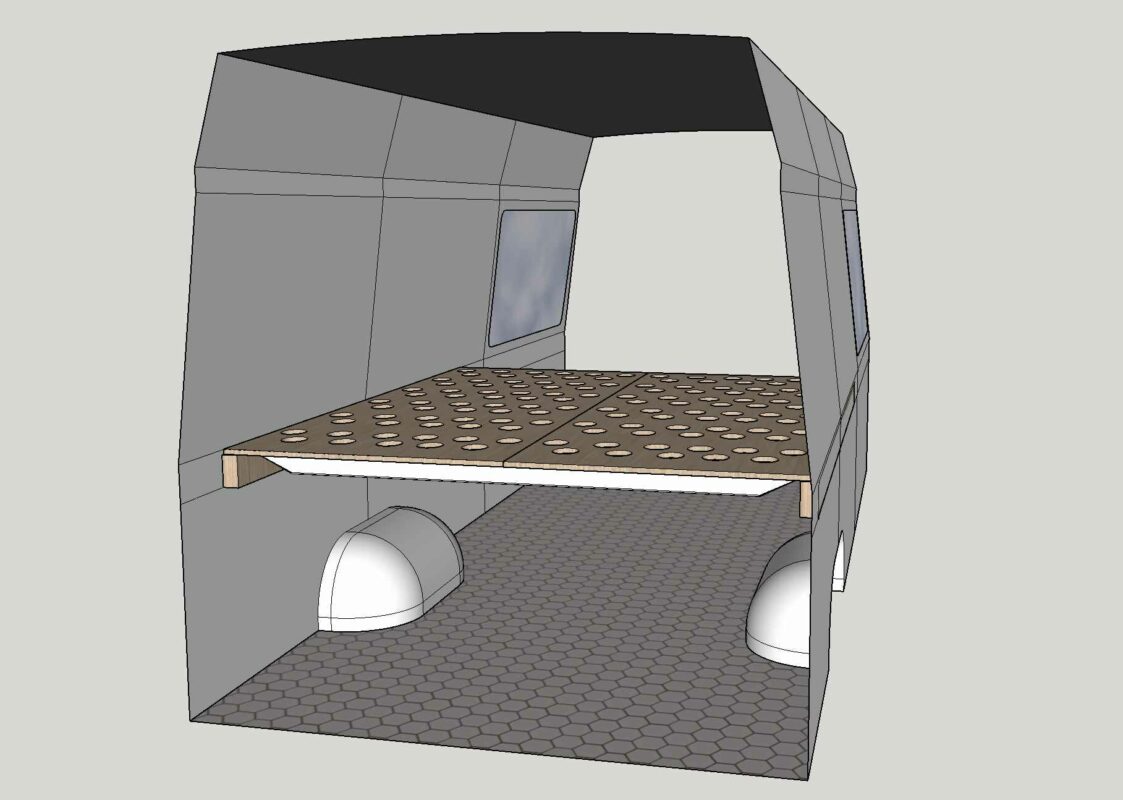
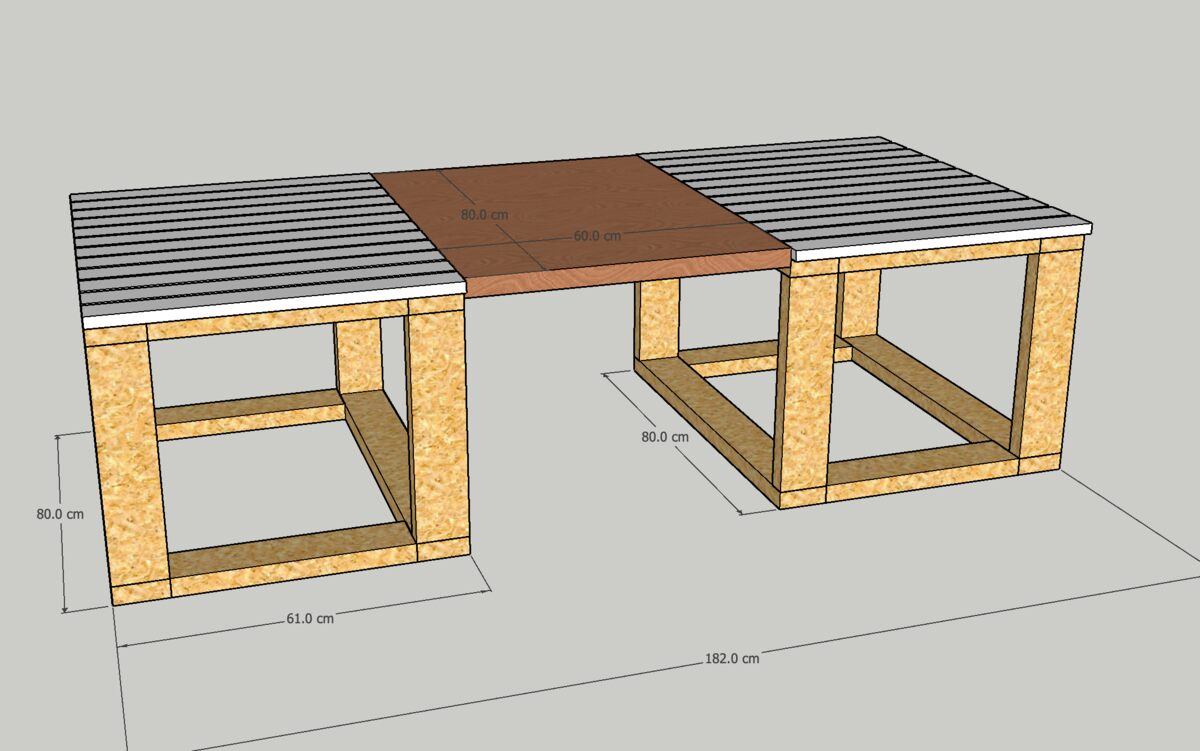
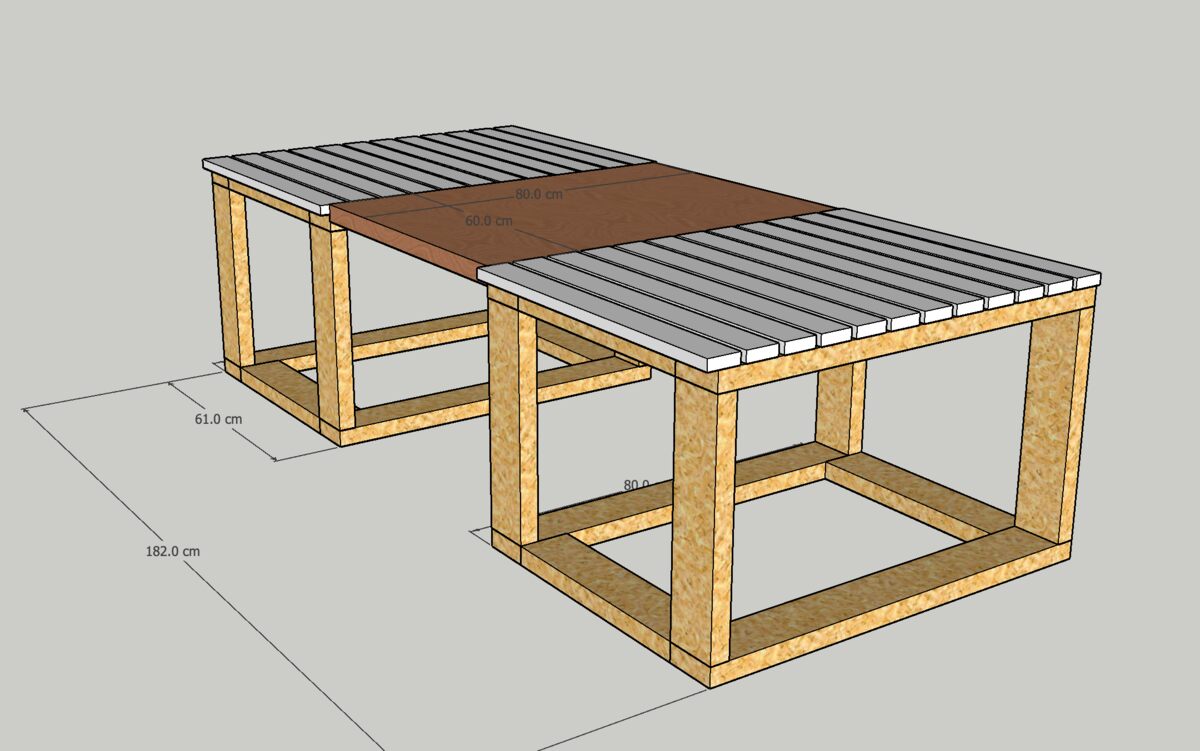
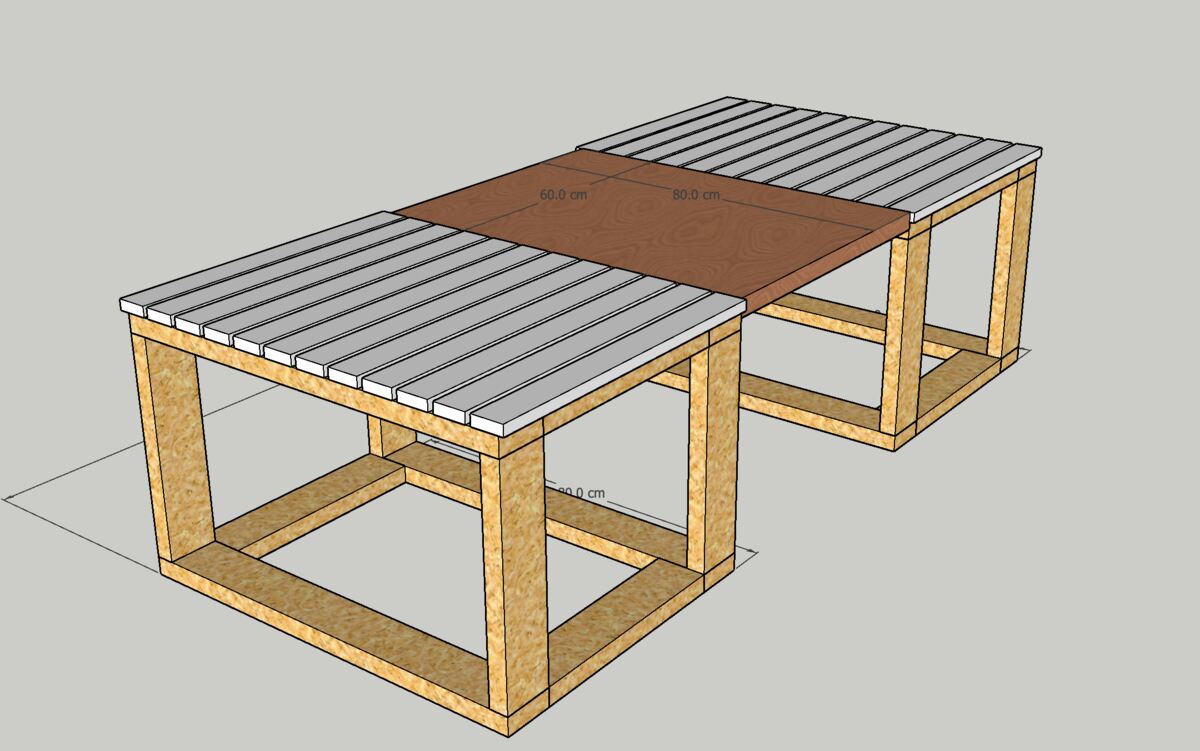
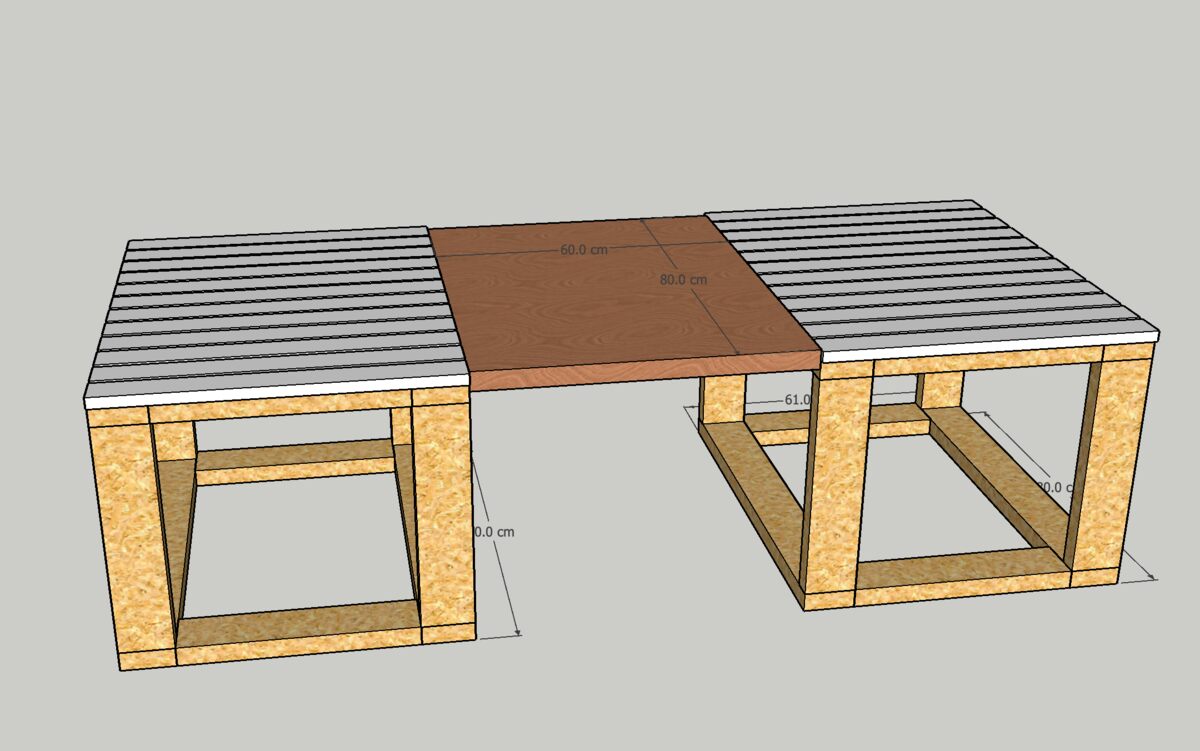
Constructing this bed follows a similar process to the van bench seat bed we discussed earlier. You can scroll up for more detailed steps on framing. In this instance, we require 3 tops and 2 frames, also known as wheel well cabinets or under-bed cabinets.
If you want to see the detailed steps, check this article on how to make camper van folding bed.
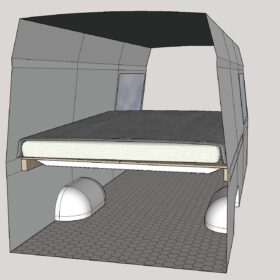
Van platform bed
Fixed platform beds in camper vans are essentially permanent sleeping areas built directly into the vehicle. They typically consist of a sturdy platform with a mattress placed on top, often with storage compartments underneath.
Constructing a fixed platform bed involves measuring the dimensions of the van interior, building a frame to fit the space, and securely attaching it to the floor or walls of the van.
Pros:
- Space Utilization: Fixed platform beds optimize space in the van by providing a dedicated sleeping area without the need for setup or conversion.
- Stability: Once installed, fixed platform beds offer a stable and secure sleeping surface, minimizing movement and vibrations while driving.
- Storage Integration: Many fixed platform bed designs incorporate storage compartments underneath, maximizing storage space in the van.
- Comfort: With the right mattress and support system, fixed platform beds can offer comfortable sleeping arrangements comparable to traditional beds.
Cons:
- Permanent Fixture: Fixed platform beds are a permanent addition to the van interior, limiting flexibility in layout and potentially reducing resale value.]
- Space Limitations: The size of the fixed platform bed is constrained by the dimensions of the van interior, which may not provide ample space for taller individuals or multiple sleepers.
- Installation Complexity: Building and installing a fixed platform bed requires advanced carpentry skills and may be challenging for beginners.
- Accessibility: Accessing storage compartments underneath a fixed platform bed may require bending or kneeling, which could be inconvenient for some users.
Van fixed platform beds offer a stable and space-efficient sleeping solution for camper van conversions. While they provide benefits such as stability, storage integration, and comfort, potential drawbacks include permanent installation, space limitations, installation complexity, and accessibility concerns.
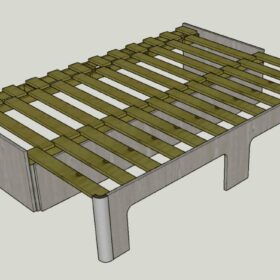
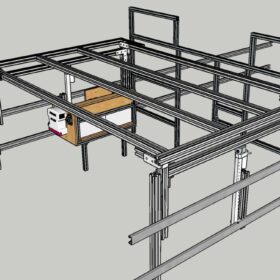
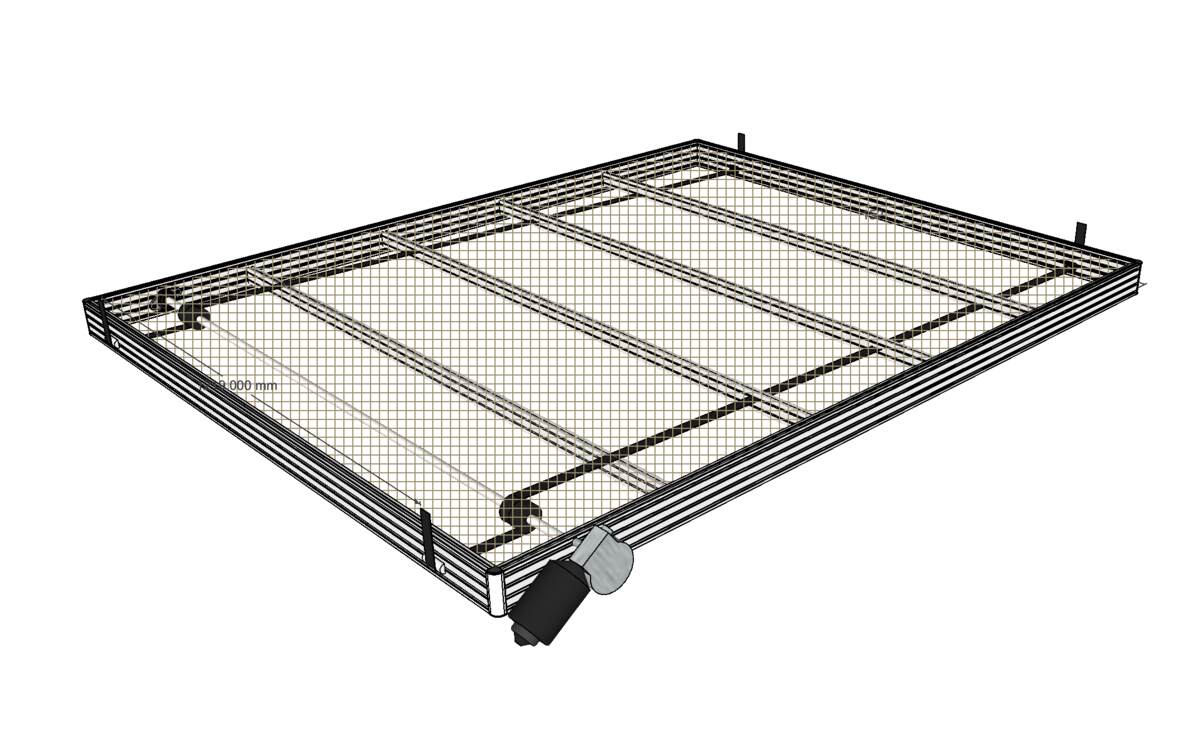
HOW TO BUILD A BED FRAME FOR YOUR VAN
Hey there, van lifer! Ready to make your travel dreams cozier? Awesome, because we’re about to whip up a super comfy bed for your van adventures! Don’t worry, it’s gonna be fun and easy.
Scroll down to see what we need and how to do it.
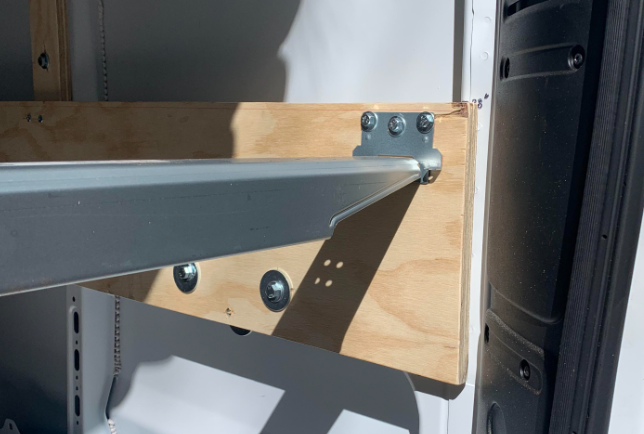
Materials & Tools Needed:
Materials:
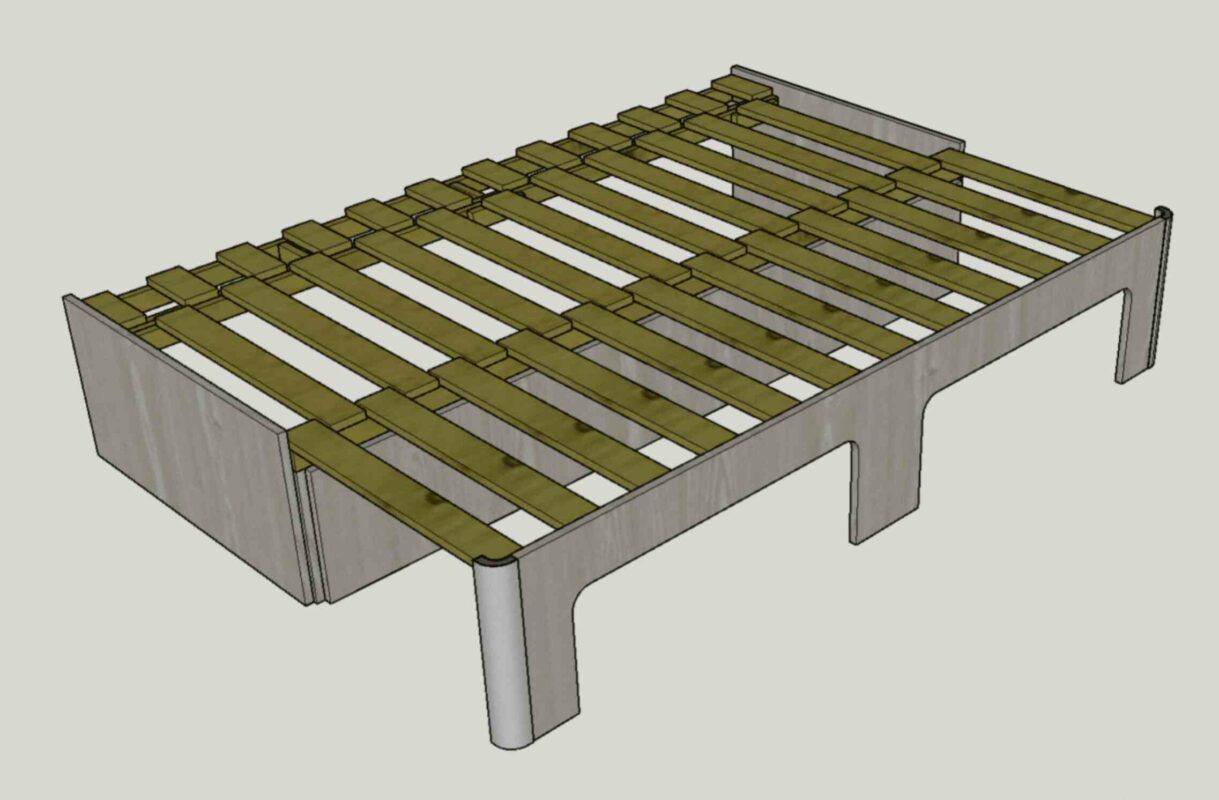
- Skorva Support Beams from Ikea: Get 3 to 4 beams depending on the size and desired strength of your bed. They cost $15 each.
- Ikea Part # 116791 Mounting Plates: You’ll need 6 to 8 pieces to secure the beams. Find them on Amazon for $8.05 for two.
- Lumber: The thickness will depend on the width of your van. You will need them if beams are too short.
- Plywood: You’ll need 2 sheets of 5/8 plywood for the top of the platform bed.
Tools:
- Drill
- Saw
- Drill & hole saw
- Measuring tape
- Screwdriver
- Safety goggles and gloves
- Screws
- Bolts
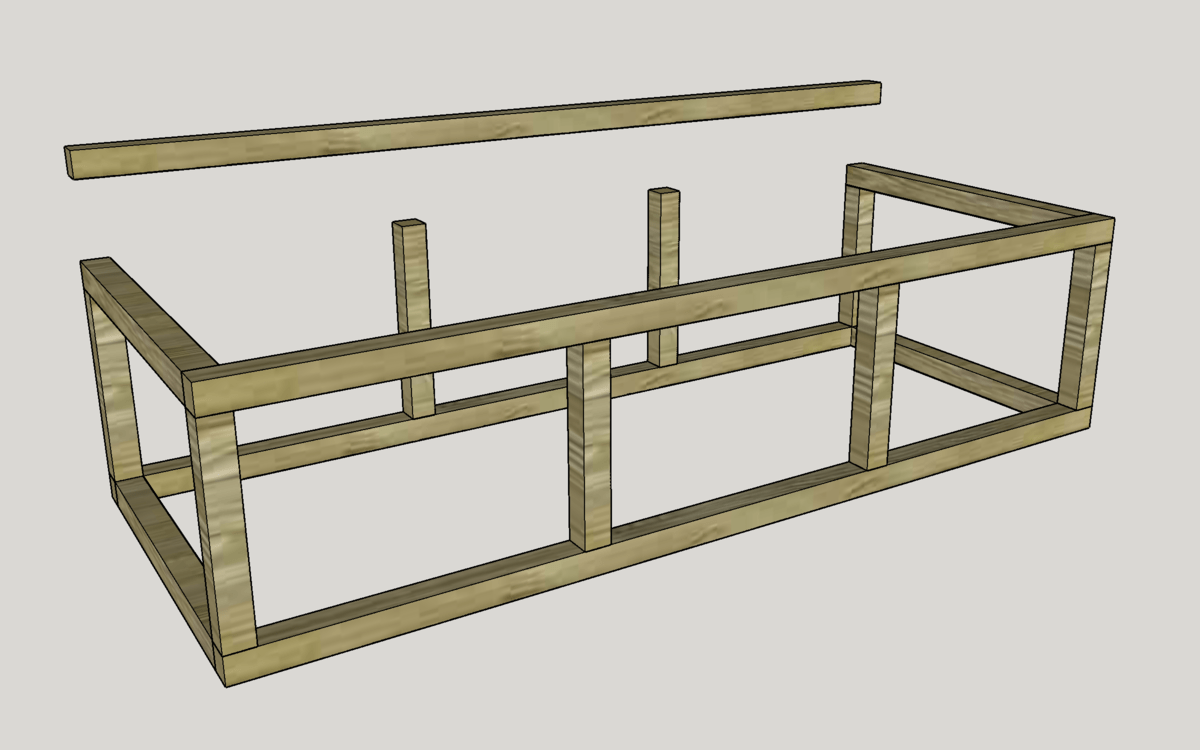
Step 1: Measure and Plan
Measure the dimensions of your van to determine the size of lumber needed. Keep in mind the maximum length of the Skorva beams (79 7/8 inches). If necessary, supplement with additional lumber of the required thickness.
Step 2: Fix Lumber to Van
Secure the lumber to your van’s interior, ensuring it’s firmly anchored and capable of supporting the weight of the bed.
Step 3: Attach Mounting Plates
Step 4: Install Skorva Beams
Place the Skorva support beams onto the mounting plates, ensuring they’re evenly spaced and securely attached.
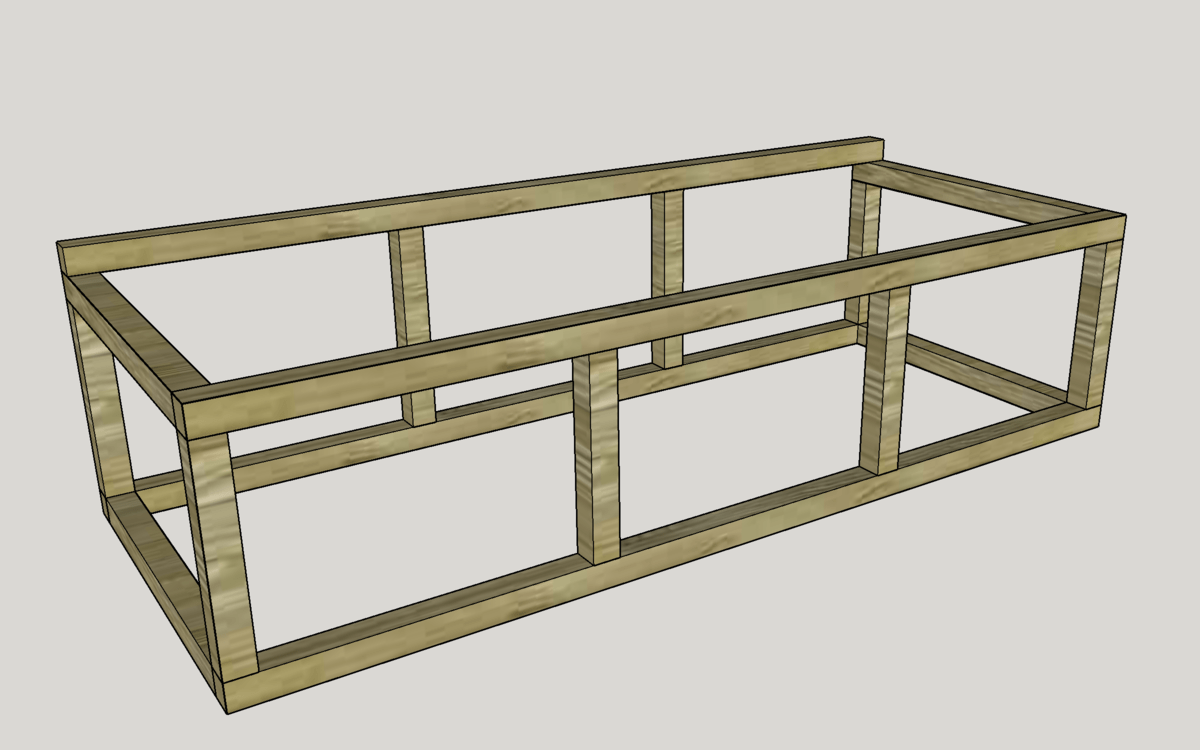
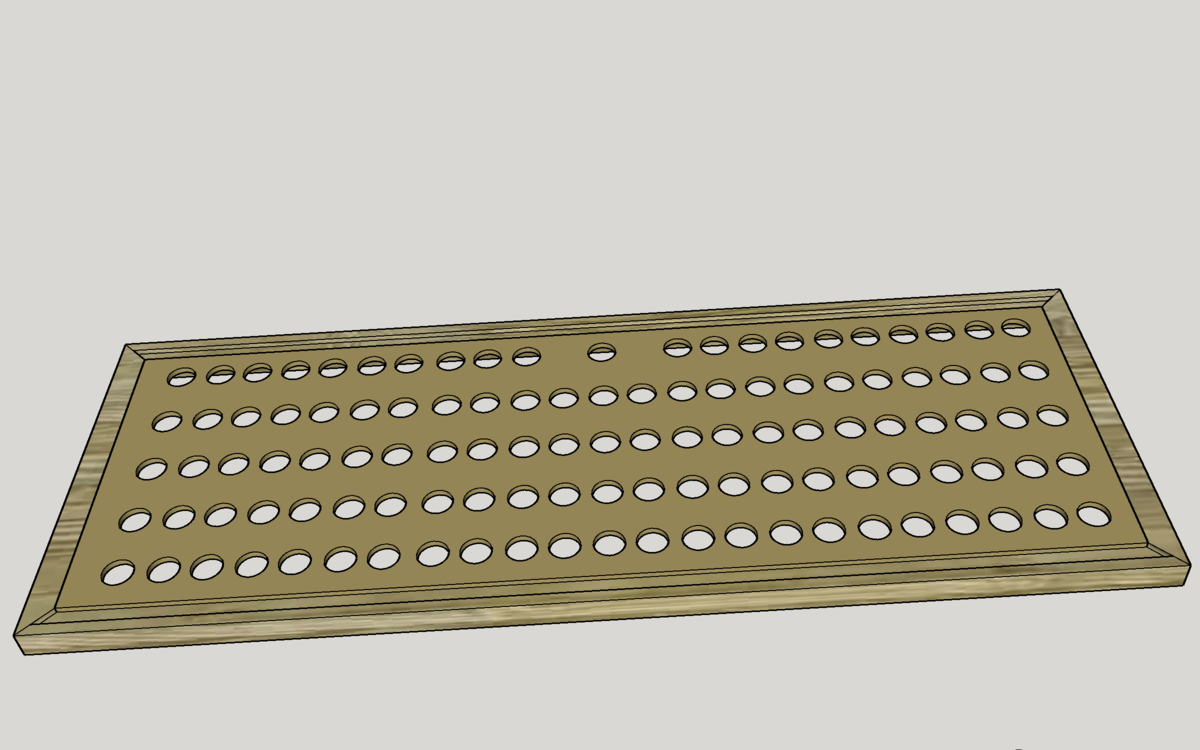
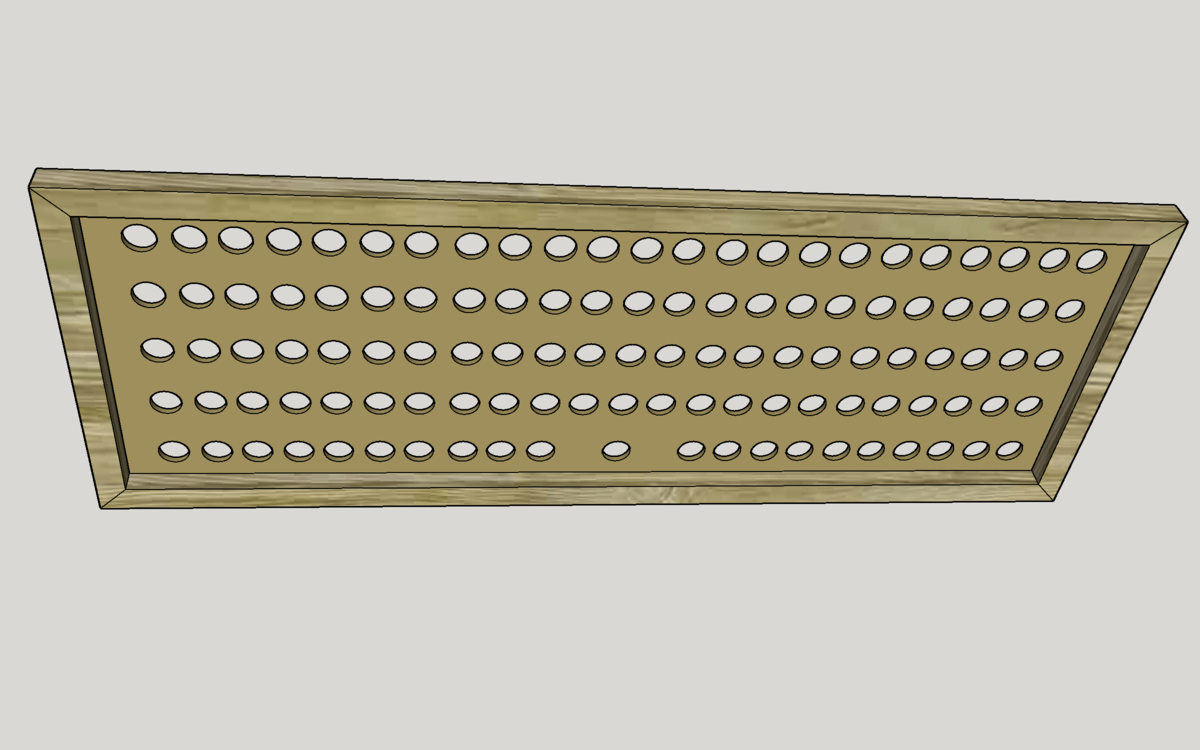
Step 5: Cut Plywood Sheets
Measure and cut the plywood sheets to fit the dimensions of the camper van bed frame.
Step 6: Drill Holes for Ventilation
Drill holes in the plywood sheets to reduce weight and improve ventilation for your mattress.
Step 7: Secure Plywood to Beams
Place the plywood sheets on top of the Skorva beams and secure them in place using screws, ensuring a snug fit.
Step 8: Add Mattress
Place your mattress on top of the plywood, ensuring it fits comfortably within the camper van bed frame. You can use Velcro straps to secure the mattress to the plywood, preventing it from sliding or moving during travel.
Step 9: Test and Enjoy
Before hitting the road, test out your newly constructed platform bed to ensure it’s sturdy and comfortable. Make any necessary adjustments for the perfect night’s sleep on your next adventure!
With this DIY platform bed, you’re not just building a place to rest; you’re crafting memories of cozy nights under the stars and waking up to breathtaking views. Happy travels and sweet dreams! 🛏️✨
Pros:
- Maximize Space: Murphy beds are nice—they disappear when you don’t need them, freeing up valuable floor space in your van for other activities.
- Versatility: Whether you’re cooking, working, or just hanging out, having a Murphy bed means you can use your van for more than just sleeping.
- Easy to Use: Folding your Murphy bed up or down is a piece of cake—just a few simple moves, and you’re ready to snooze or get moving.
- Customizable: Murphy beds come in all shapes and sizes, so you can find one that fits your van perfectly and matches your style.
Cons:
- Installation: Installing a Murphy bed in your van might need a little DIY know-how or professional help to make sure it’s safe and secure.
- Comfort: While Murphy beds can be just as comfy as regular beds, you’ll want to make sure you choose a good mattress and support system for a good night’s sleep.
- Budget: To build a Murphy beds can be a bit more expensive than regular beds because of their fancy folding mechanisms, but many people find the extra space they provide is worth it.
- Storage: When your DIY Murphy bed is folded up, you’ll need to make sure you have somewhere to store your bedding and pillows so they don’t get in the way.
Van Murphy beds are the perfect solution for making the most of your space in your camper van. Whether you’re on the road or parked up for the night, having a Murphy bed means you’ll always have a comfy place to rest your head!
Pros:
- More Space: You get more space in your van because the bed can be pushed back when you’re not sleeping.
- Handy: During the day, you can use the extra space for living or storage.
- Comfy: If you choose a good mattress, slide-out beds can be just as comfy as regular beds.
- Easy to Use: Using a slide-out bed is simple – you just pull it out when you need it, and push it back when you’re done.
Cons:
- Installation: Putting in a slide-out bed might need changes to your van and making sure it’s safe.
- Less Storage: Because of how they work, slide-out beds might limit where you can store things in your van.
- Maintenance: Slide-out beds have parts that might need fixing or looking after over time.
- Cost: Slide-out beds might cost more than other bed options because of how they’re made and installed.
In short, slide-out van beds are a handy way to save space and get a good night’s sleep in your camper. But, you might need to think about how they fit in your van, how to keep them in good shape, and the cost before getting one.
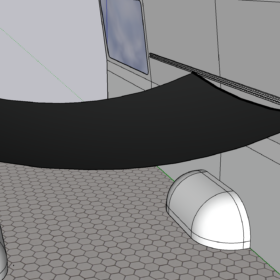
Pros:
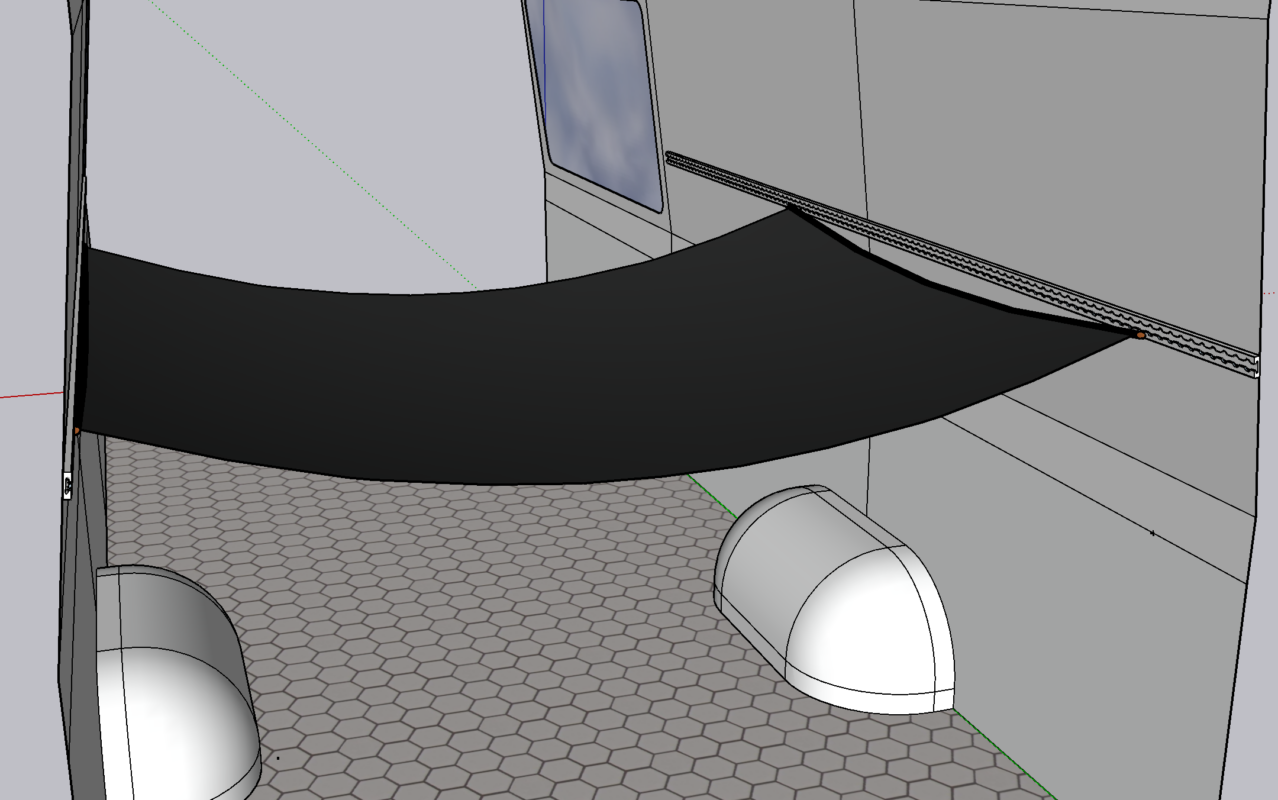
- Space-Saving: Hammock beds take up minimal space when not in use, allowing for more floor space during the day.
- Comfort: Sleeping in a hammock can be incredibly comfortable, providing a gentle sway that lulls you to sleep.
- Versatility: Hammocks can easily be removed or repositioned, offering flexibility in the van layout.
- Breathability: Hammocks allow for airflow all around, which can be especially beneficial in hot climates or during warm nights.
Cons:
- Installation: Installing a hammock bed in a van requires sturdy anchor points and careful consideration of weight distribution to ensure safety.
- Limited Space: While hammocks save floor space, they may not be suitable for everyone, especially those who prefer a more traditional sleeping surface.
- Single Sleeper: Hammocks are typically designed for one person, which may not be ideal for couples or families.
- Adjustment: Finding the right height and tension for the hammock can take some trial and error to achieve optimal comfort.
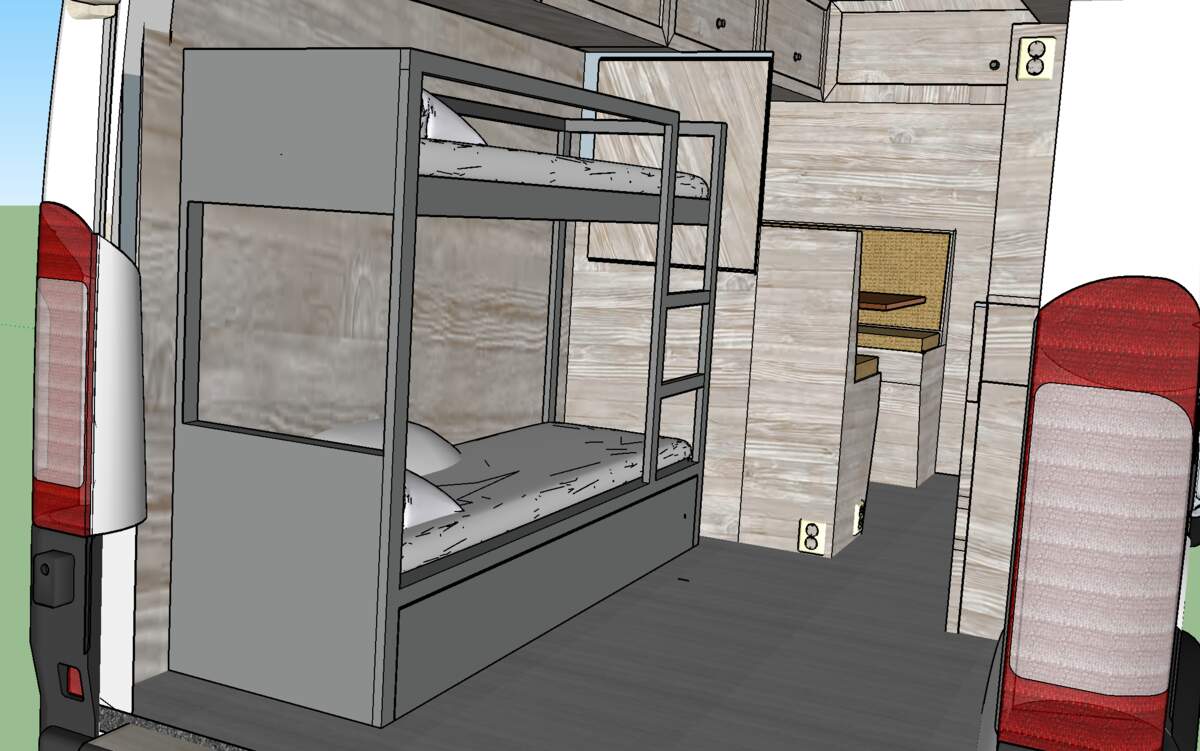
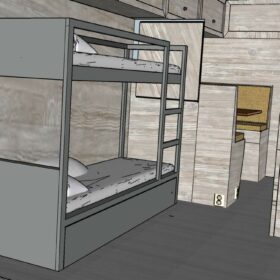
Pros:
- Space Optimization: Bunk beds make efficient use of vertical space, leaving more room for other amenities or storage in the van.
- Sleeping Capacity: By providing two sleeping areas, bunk beds accommodate more people in the van, making them ideal for families or groups of friends.
- Separate Sleeping Spaces: Each bunk offers privacy and personal space, allowing occupants to have their own cozy nook for sleeping.
- Versatility: Some bunk bed designs offer flexibility, with the option to fold up or convert into seating during the day, providing multi-functional use of space.
Cons:
- Height Restrictions: The upper bunk may have limited headroom, making it less suitable for taller individuals or those prone to feeling claustrophobic.
- Accessibility: Climbing up to the upper bunk may be challenging for some individuals, especially children or those with mobility issues.
- Safety: Proper installation and secure anchoring of bunk beds are crucial to prevent accidents, especially while driving.
- Weight Distribution: Careful consideration of weight distribution is necessary to ensure the van remains balanced and stable with the added weight of bunk beds and occupants.
Van bunk beds offer a space-efficient and practical sleeping solution for camper van conversions. While they provide benefits such as space optimization, increased sleeping capacity, and separate sleeping areas, potential considerations include height restrictions, accessibility, safety, and weight distribution.
Pros:
- Space Saver: Lift beds save precious floor space by lifting up when you’re not using them. It’s like having a secret hideaway!
- Do-It-All Space: The area under the bed becomes a playground for your imagination—use it for games, storage, or even a cozy reading nook.
- Your Way, Every Way: Lift beds come in all shapes and sizes, so you can customize yours to fit your van and your style perfectly.
- Dreamy Comfort: With a soft mattress and sturdy support, lift beds are just as comfy as your bed at home, making sure you sleep like a baby wherever you roam.
Cons:
- Set-Up Sensibility: Putting in a lift bed needs some planning and care to make sure it’s safe and snug in your van.
- Gentle Giants: Lift beds work like magic, but they need a little TLC now and then to keep them running smoothly.
- Price Points: While lift beds are awesome, they might cost a bit more than other options because they’re so cool and clever.
- Easy Access: Climbing up to your lift bed might need a little ninja moves, especially if your van’s got lots of stuff in it.
So, if you’re looking to maximize space and add some magic to your camper van, a lift bed could be just the ticket!
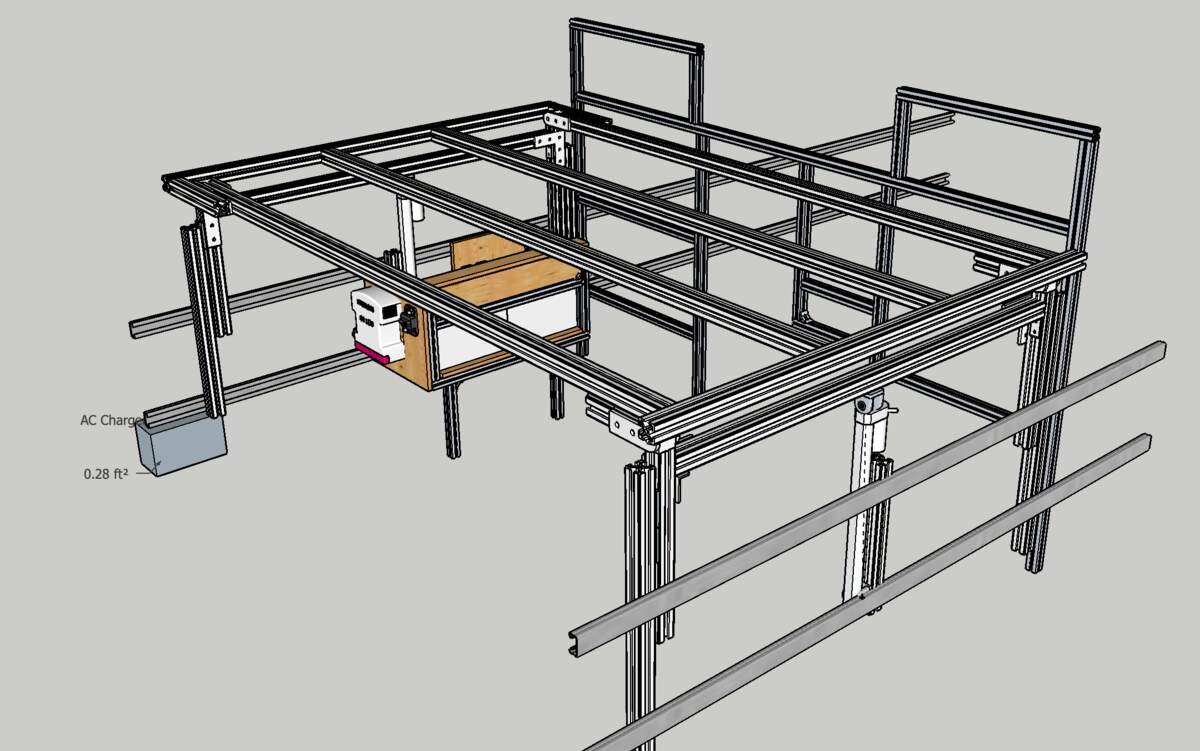
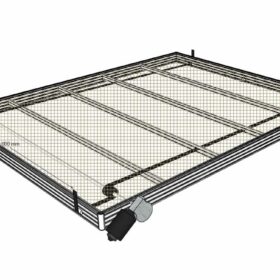
Pros:
- Featherweight Strength: 80/20 aluminum is like the superhero of materials—it’s super light but crazy strong, giving you a bed that won’t weigh you down on the road.
- Customizable Comfort: With 80/20 aluminum, you can design your bed exactly how you want it, whether you need extra storage underneath or a sleek, minimalist look.
- Rust-Proof Resilience: Aluminum doesn’t rust, so your bed will stay looking sharp for years to come, even after braving rain, snow, and mud.
- Easy Assembly: Putting together an 80/20 aluminum bed is a breeze—just snap the pieces together like giant LEGO blocks and you’re ready to hit the road!
Cons:
- Budget Check: While 80/20 aluminum beds are awesome, they might be a bit pricier than other options. But hey, you’re investing in quality and durability!
- Tool Time: You might need some basic tools and a little DIY spirit to assemble your 80/20 aluminum bed, but trust us, it’s worth it for the customizability.
- Insulation Insights: Aluminum can get chilly in cold weather, so make sure to add some insulation under your mattress to keep cozy on frosty nights.
- Size Matters: Measure twice, cut once! Make sure you get the right size and shape for your van so your bed fits like a glove.
80/20 aluminum van beds are the perfect blend of strength, style, and versatility. Whether you’re a weekend warrior or a full-time van lifer, these beds are ready to support your adventures in comfort and style!
ROCK and ROLL CAMPER VAN BED
Pros:
- Space Optimization: Rock and Roll beds maximize space in RVs, allowing you to create additional storage or living area.
- Multifunctional: They serve dual purposes for sitting and sleeping, making them ideal for small spaces.
- Customization: DIY enthusiasts can customize the design and materials to suit their preferences and van layout.
- Affordability: Making a rock ‘n’ roll bed can be more cost-effective compared to buying a pre-made one.
Cons:
- Building a rock ‘n’ roll bed requires precision and knowledge of carpentry techniques, which can be challenging for beginners.
- Time-consuming: DIY projects can be time-consuming, especially if you’re new to woodworking or van conversions.
- Security issues. Improperly designed beds can pose safety hazards, such as collapsing or becoming unstable during use.
- Limited Features: DIY versions may lack features found in commercial rock and roll beds, such as built-in storage or simple adjustment mechanisms.

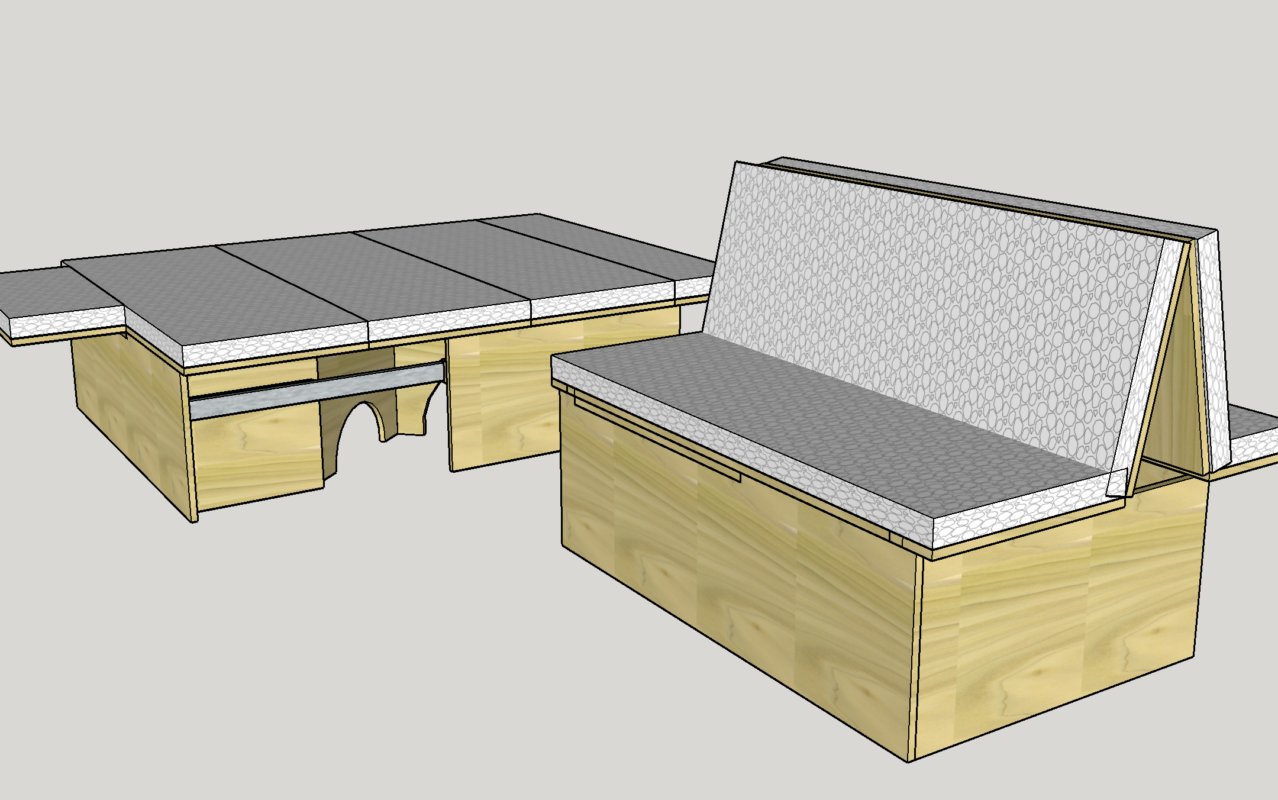
Pros:
- Dual Functionality: Van table beds are like the Swiss Army knife of furniture—they serve as both a functional table and a comfortable bed, saving precious space in your van.
- Space Optimization: With a van table bed, you’re making the most of every square inch of your mobile home. No need to choose between a dining area and a sleeping area—you get both!
- Customization Options: From sleek, modern designs to rustic, DIY creations, van table beds come in all shapes and styles to suit your taste and van layout.
- Easy Setup: Transitioning from table to bed (and vice versa) is a breeze. Just a few simple steps, and you’re ready to relax or get to work in your cozy sleeping spot.
Cons:
- Size Matters: Before you dive into the world of van table beds, make sure you measure your van carefully to ensure the table bed will fit comfortably in your space.
- Sturdiness and Support: Look for a table bed that offers sturdy construction and reliable support, ensuring a safe and comfortable sleeping experience.
- Comfort Factor: While van table beds provide a convenient sleeping solution, they may not offer the same level of comfort as traditional beds.
- Consider adding a mattress topper or extra cushions for a more plush sleeping surface.
- Storage Space: Depending on the design of your van table bed, you may need to consider additional storage options for bedding, pillows, and other essentials.
Van table beds are a versatile and practical solution for maximizing space in your mobile home. Whether you’re dining, working, or catching some Z’s, these multi-functional pieces of furniture have got you covered!
VAN POP-TOP BED
Pros:
- More Room: With a pop top bed, you get extra sleeping space without losing any living or storage areas in your van.
- Fresh Air and Views: Sleeping in a pop top bed lets you feel the breeze and see the stars, making camping even more fun!
- Easy to Drive: Pop top beds don’t make your van heavy or bulky, so driving is still easy-peasy.
- Lots of Uses: Whether you’re sleeping, chilling, or just enjoying the scenery, pop top beds can do it all.
Cons:
- Get Help Installing: Putting in a pop top bed needs a pro to do it right. And remember, you’ll need to look after it to keep it working well.
- Think About the Weather: Pop top beds keep you cool in summer, but they might not be as warm in winter. You might need extra blankets or insulation.
- Watch Your Head: The raised roof might not be tall enough for everyone, so check if you’ve got enough room to stand up comfortably.
- Cost Check: Pop top beds can cost more than regular ones, but lots of campers think they’re worth every penny for the extra space and views.
So, if you’re dreaming of sleeping under the stars without leaving your van, a pop top bed could be just what you need for your next adventure!
FREE VAN BED PLANS
Explore these free DIY small van bed ideas that anyone can easily undertake. Each bed comes with free Sketchup van bed frame plans, allowing you to visualize the design in 3D, download the plans, and open them in Sketchup. Adjust the dimensions as needed to suit your van size and individual requirements.
The bed options are as follows:
DIY Sliding Couch-Bed for Camper Vans
DIY Futon Bed for Camper Vans
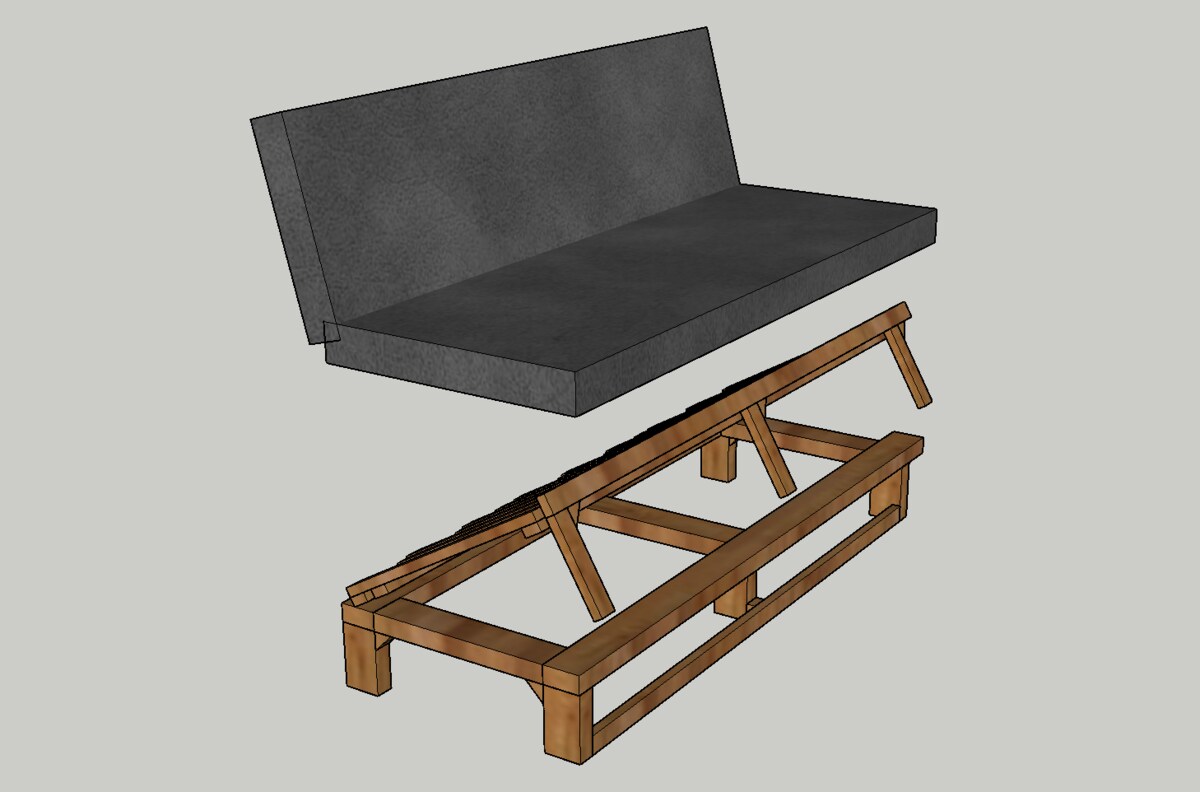
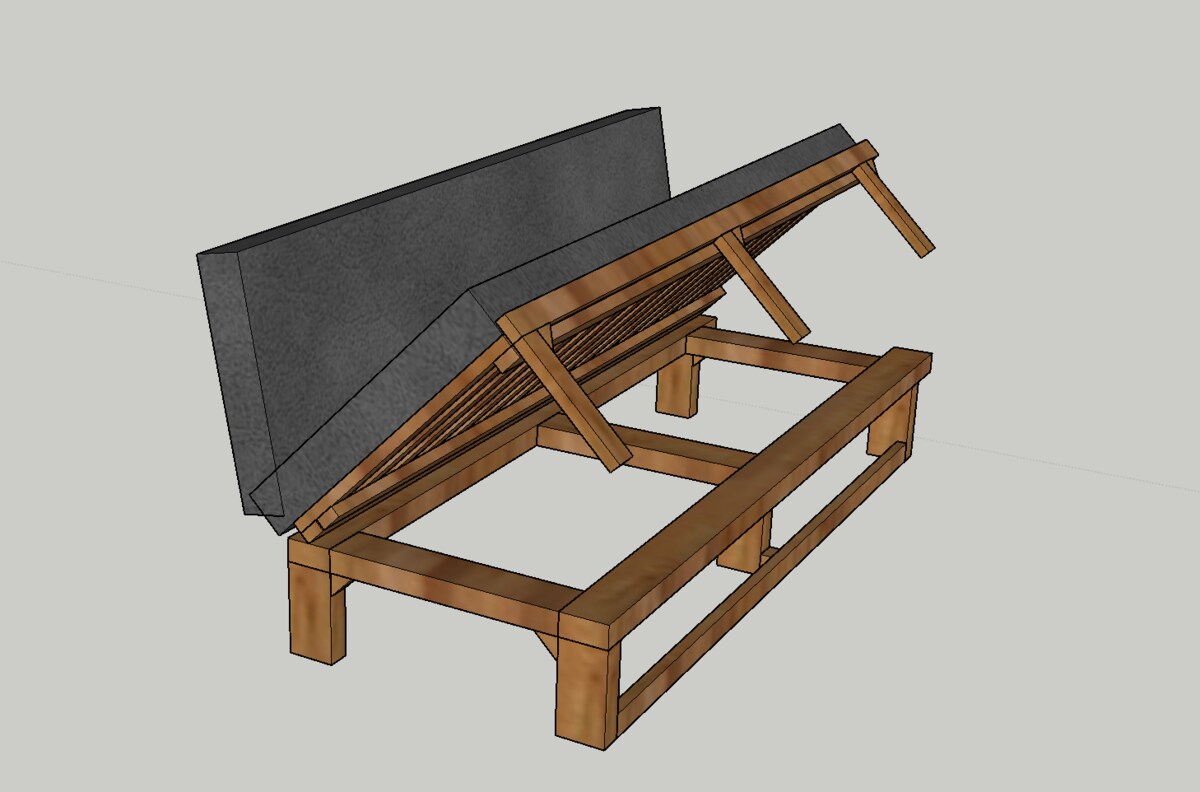
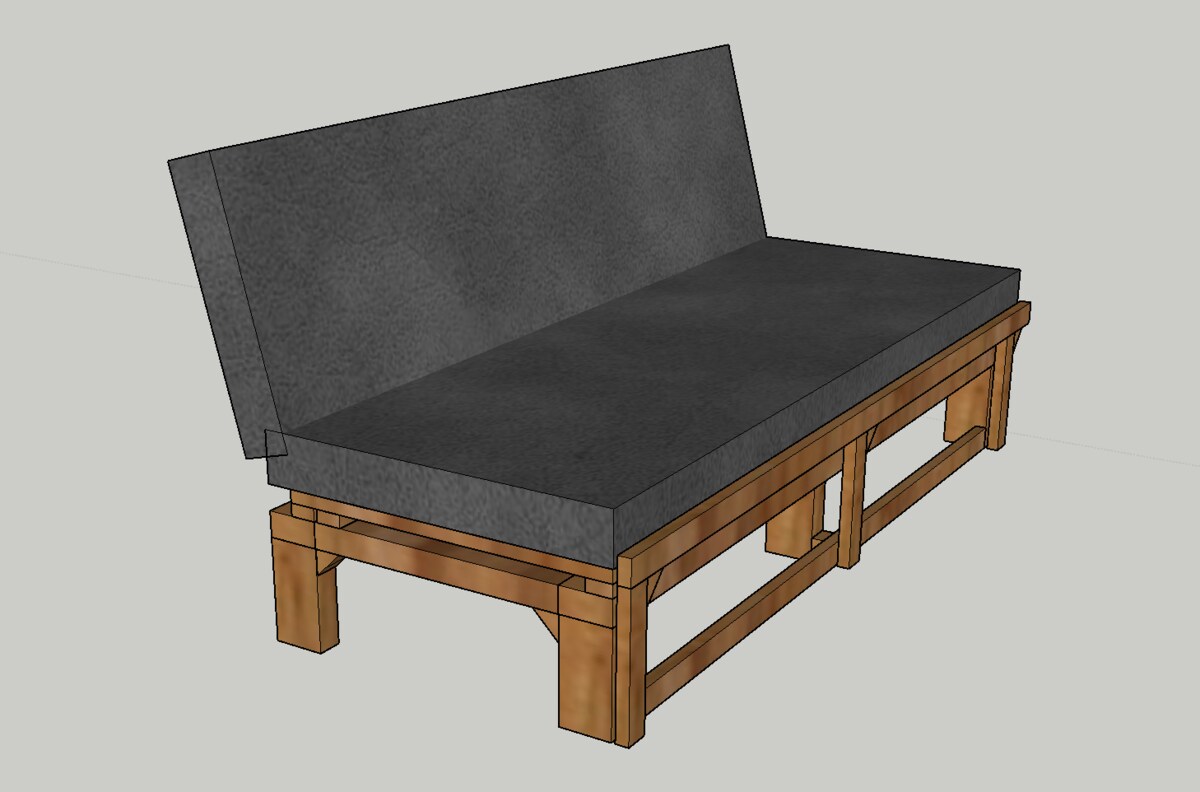
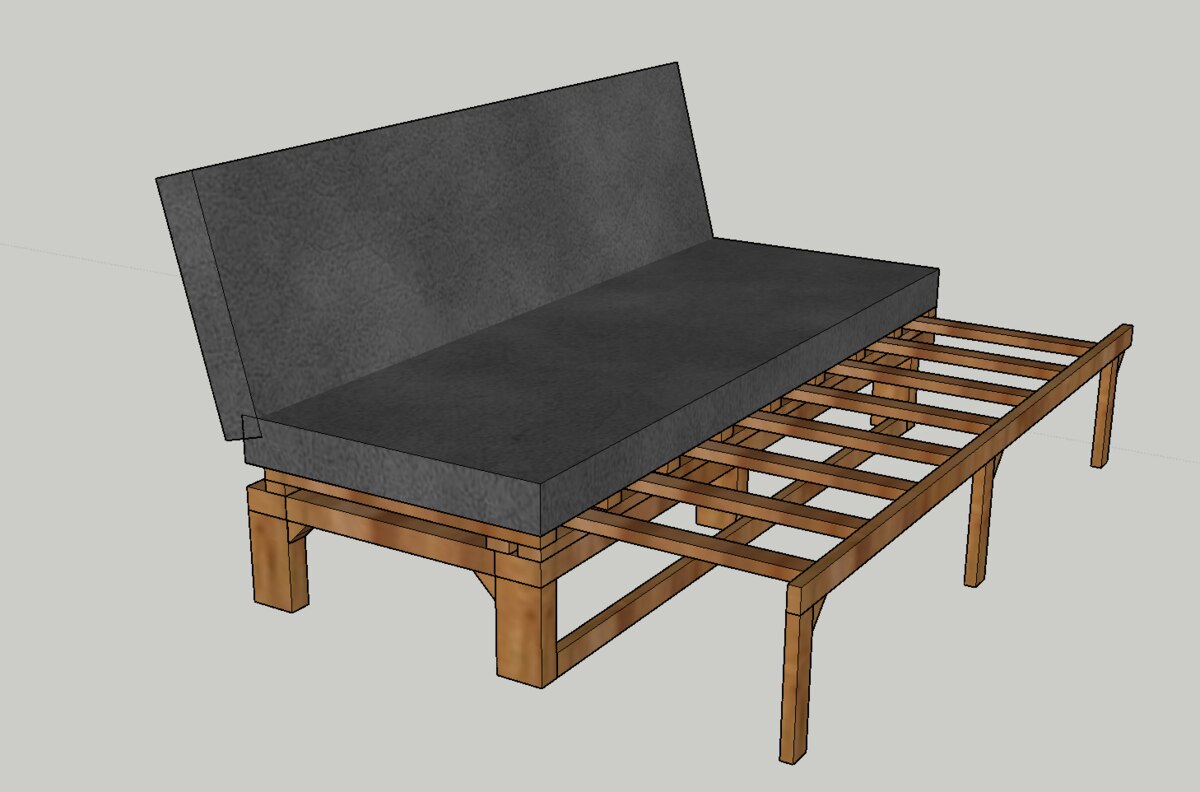
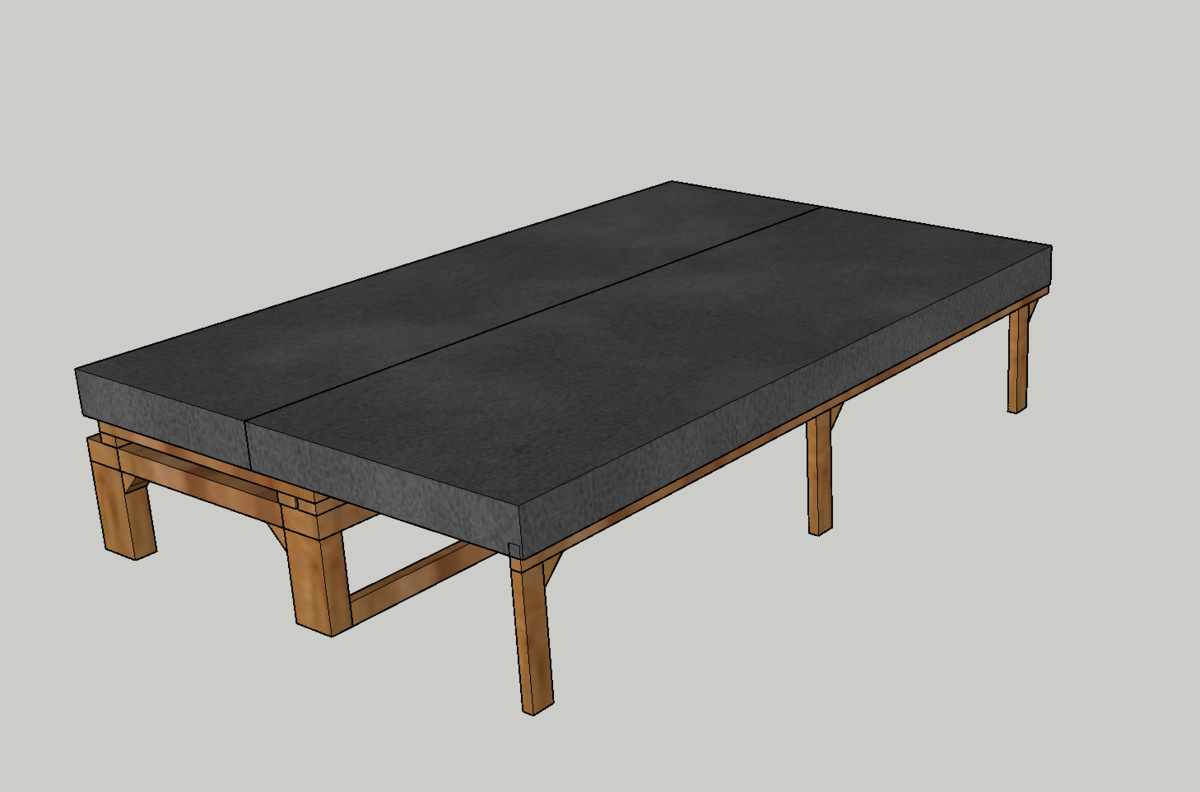
Table Bed DIY Solution
Elevator Bed for Van

CONCLUSION
Building a camper van bed is an exciting project that can greatly enhance your van life experience. Whether you opt for a DIY bed frame using wood or an aluminum frame for added durability, the result will be a comfortable and cozy space for your adventures on the road. Alternatively, if you hit the road and enjoy the great outdoors as soon as possible, you can use our Van2b camper van beds and all other camper van conversion parts to save time and finish your project sooner.
Happy camping!
Author

Our products
Van Conversion Products
Mercedes Sprinter Van Murphy Bed
Beds
Ford Transit Van Murphy Bed
Beds
Ram Promaster Murphy Bed
Cabinets
Mercedes Sprinter Van Wheel Well Cabinets
Camper Van Cabinets
Ford Transit Van Wheel Well Cabinets
Cabinets
Ram Promaster Wheel Well Cabinets
Cabinets
Mercedes Sprinter Van Galley Cabinets
Camper Van Cabinets
Ford Transit Galley Cabinets
Posts you may like
Van Flares Guide: What They Are, Why You Need Them, and How to Choose the Right Ones
May
The 10 Best Vans for Van Life
Jun
Stealth van camping: Everything you need to know
Dec
Van flooring: The complete guide
Jan
16 Van Folding Bed Q&A for Camper Van DIYers
Jun
Do Not Buy Vancubic Until You Read This Article: The Pros and Cons Unveiled
Jul
Ford Transit vs Mercedes Sprinter reliability: side-by-side comparison
Feb
How to put a bed in a Sprinter van
Feb