


Curious how van lifers fit a comfy bed sideways? Van flares are the secret!
When I first started converting my Sprinter van, one of the best upgrades I made was adding van flares—also known as bump outs, side flares, or window popouts. Before installing them, I used to sleep curled up tight. But with the Sprinter flares in place? Game changer! Now I can stretch out sideways and actually get a good night’s sleep!
Got a Mercedes Sprinter, Ford Transit, or Ram Promaster van? This guide is like a friendly chat, sharing all my best tips on van flares and capsules – how to put them in, what’s great (and not so great) about them.
Ok. Let’s start.
Why Get Van Flares?
My biggest problem with a normal van was trying to sleep. I’m not super tall, but trying to stretch out straight from front to back just ate up so much space. If I tried to sleep sideways, my feet would be squished against one wall and my head against the other. It was like sleeping in a coffin! Most vans, I learned, only give you about 68 to 71 inches of bed width inside without these “pop-outs.” That’s just too short for anyone over about 5’7″ to really stretch out comfortably.
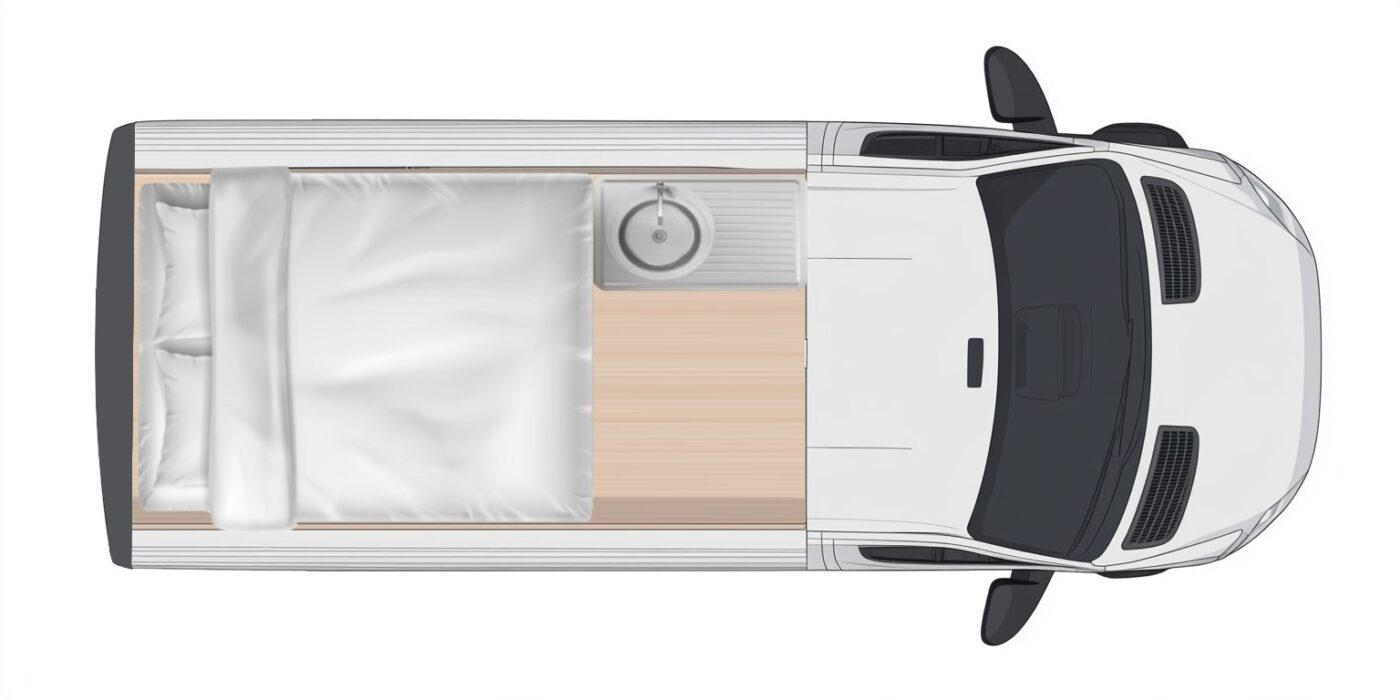
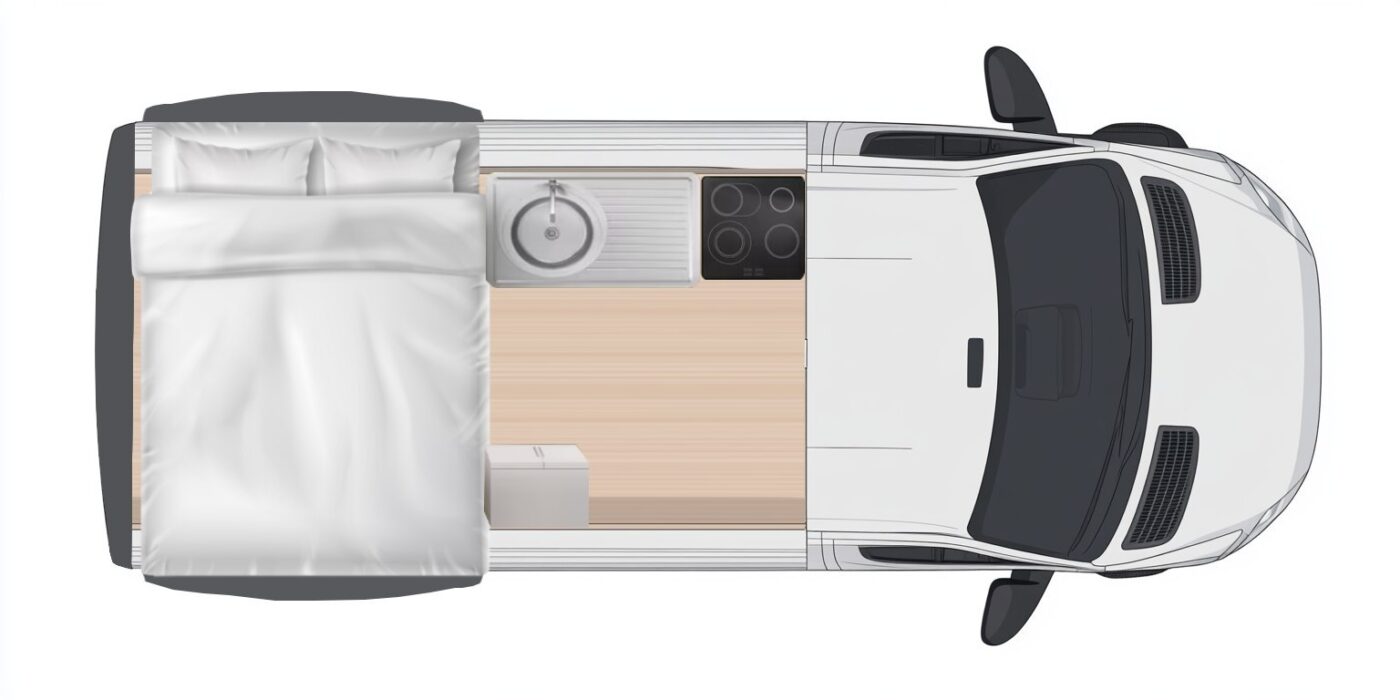
That’s where flares came in. They’re basically these big bubbles that stick out from the sides of your van. They added about 10-12 inches of total width to my sleeping area! Suddenly, I could sleep sideways without my feet or head touching the walls. That meant my bed wasn’t taking up the whole middle of the van anymore. It felt like I gained a whole new room for my kitchen and living area. This extra space directly impacts how much I enjoy being in my van – it’s so much more comfortable now, especially for getting good rest.
What Kinds of Flares Are Out There?
When I started looking, I found out there are different kinds, mainly based on your van model. You have to get the right one for your van’s year and shape – it’s like buying custom shoes! Most are made for Mercedes Sprinters (like my Sprinter van flares for 144’s), Ford Transits, or Ram Promasters. They generally fit both high-roof and long vans.
But then I learned about the two big players: Flare Space flares and Van Speed capsules. This was a big decision for me! I go into all the details — including pros and cons, costs, and installation info — in this deep-dive blog post about FlareSpace flares and VanSpeed capsules.
Do You Need Windows?
You can get them solid (no windows) or with windows. I went with windows for extra light and airflow. Van Speed offers cool CR Lawrence sliding bunk windows which are great for ventilation and keeping bugs out.
Materials.
Most good flares are made of fiberglass, which is super strong and lasts a long time. You’ll see some cheaper ones made of plastic, but I heard those might not hold up as well.

Which Vans Can Use Flares?
Flares aren’t one-size-fits-all. They’re made to fit specific models:
- Flarespace Sprinter (144 and 170)
- Ford Transit flares
- Ram Promaster (limited options)
- High-roof and extended wheelbase vans
If you’re searching for “flares near me” to get them installed, make sure the shop has experience with your exact van model and year.
With or Without Windows?
You can buy Sprinter window flares or solid ones:
- Window flares: Great for light, views, and airflow. I chose a sliding window style and love it.
- Solid flares: Better insulation and stealth.
About installation
Can You Install Them Yourself?
Yes, you can—but it’s not exactly a beginner-friendly project. It definitely helps to have an extra set of hands (and some experience doesn’t hurt either).
Okay, this was the scariest part for me: you have to cut a big hole in your van! It’s just like installing a window, but on a bigger scale.
Hiring a Pro
If cutting metal scares you, pay $500–$1,000 for a pro. They’ll ensure no leaks and a perfect fit. I almost went this route, but DIYing was rewarding and saved cash.
Tools
Here’s a full list of tools that are good to have for installing van flares, like Flarespace Sprinter side flares, Ford Transit flares, or any other DIY bump outs. You can probably get the job done without every single item, but having more of them makes the job easier and cleaner.
Cutting & Drilling
- Metal-cutting nibbler (best for clean cuts through sheet metal – see this video)
- OR Jigsaw with metal blades (a common alternative – see this video)
- Cordless drill & bits (for pilot holes, fasteners if needed)
Measuring & Layout
- Tape measure
- Straight edge or ruler
- Level (small one is fine)
- Masking tape (for marking cut lines and holding templates)
- Marker or paint pen
Safety Gear
- Work gloves
- Safety glasses
- Hearing protection
- Dust mask or respirator (cutting fiberglass or metal creates fine dust)
Adhesion & Sealing
- Automotive-grade adhesive/sealant (like 3M 5200 or Sikaflex)
- Primer/etching compound (to prevent rust around cut edges)
- Caulk gun (for applying sealant)
- Clamps or painter’s tape (to hold the flare in place while curing)
- Alcohol wipes or degreaser (for surface prep)
Finishing
- Sanding block or flap disc (smooth rough edges)
- Rags or shop towels
- Touch-up paint or primer (protect exposed metal edges)
Is it Hard?
For me, it looked pretty tough. My friend is really good at DIY stuff, so he helped. He said it was “moderately complex.” Basically, if you’re good with tools and comfortable cutting metal, you can do it yourself. But if you’re like me and prefer not to mess up your van, getting a pro to do it is a smart move. You really don’t want leaks!
Installation Advantage: This is where VanSpeed capsules really shined. They have this cool flange design that wraps around the cut-out, so you can clamp them in place from inside the van while the glue dries. My friend said this made it much easier to get a super strong, consistent bond. For Flare Space, you often have to rely on tape from the outside, which can be trickier.
Time:
Even for experienced people, it can take 6-10 hours for both sides.
Instructions
Good brands will send you templates and videos to help, which is super helpful if you go the DIY route.
After they’re installed, you’ll want to insulate them inside. It makes a huge difference for keeping the van warm in winter and cool in summer. My flares weren’t pre-insulated, so that was an extra step.
Paint & Matching
Don’t forget: flares come in a primer or gel coat, so you’ll need to paint them. Matching your van’s color perfectly might require pulling a body panel so the shop can scan it with a spectrometer.
- Painting cost: $600–$1,200
- Install cost: $500–$1,000
- Total cost: $2,500–$4,500 depending on brand and install

What About the Cost? (My Wallet Felt This One!)
Flares aren’t cheap, but I really believe they’re worth it for the space.
- Just the Flares: When I was looking, Van Speed capsules were around $1,799, while Flare Space flares were about $2,500. So Van Speed was actually $700-$800 cheaper for a similar space gain!
- Painting: They usually come in plain white or gray, so you’ll need to paint them to match your van. That cost me another $600-$1,200. My paint shop even removed a small piece of my van (like the fuel flap) to get a perfect color match with their fancy spectrometer – just using the paint code isn’t always enough!
- Installation: If you get a pro to install them (which I recommend!), factor in another $500-$1,000.
- My Total: For my setup with Van Speed, painting, and installation, it came out to be about $3,000 to $4,000 all in.
Final Thoughts: Are Van Flares Worth It?
Absolutely!
Being able to sleep sideways makes van life so much more comfortable for me. It means I have more room for everything else, and my van feels much more like a tiny home.
Interior Finishing: A Small Detail, Big Difference
One thing I learned about later is how much easier the interior trim is with the squared-off Van Speed capsules. Their straighter lines mean less complicated upholstery work inside. Those curvy Flare Space ones often need special, more expensive trim rings to finish the inside neatly. My friend, who’s good with upholstery, said the Van Speed design made his job much simpler for the interior.
Quick Answers to Common Questions:
Fitment & Compatibility
- Q: Will van flares fit my van model?
A: Van flares are custom-designed to fit specific models like the Mercedes Sprinter (144, 170), Ford Transit, and Ram Promaster. Always confirm the exact year and body style of your van before purchasing. - Q: Do Sprinter van window flares fit all Sprinter models?
A: No, Sprinter van window flares are model-specific. Make sure to choose flares that match your Sprinter’s wheelbase (144 or 170). - Q: Do I need to cut my van to install flares?
A: Yes, installing flares requires cutting out a section of your van’s side panels. It’s similar to a window installation and involves precision tools and careful sealing. - Q: Can I install flares on a high-roof or extended van?
A: Yes, most flares are compatible with both high-roof and extended wheelbase models, but always check with the manufacturer for compatibility.
Installation
- Q: How hard is it to install van flares?
A: Installation is moderately complex. While experienced DIYers can handle it, many van owners prefer professional installation to ensure proper sealing and finish. - Q: Do I need professional installation or can I DIY?
A: If you’re comfortable with cutting metal and applying adhesives, you can DIY. Otherwise, professional installation is recommended to avoid leaks and ensure structural integrity. - Q: What tools are required to install window flares?
A: Tools typically include a metal nibbler or jigsaw, drill, primer, sealant, adhesive, clamps or tape, and protective gear. - Q: How long does installation take?
A: A typical installation takes 6–10 hours for both sides, depending on experience and prep time. - Q: Are instructions or templates included?
A: Most reputable brands provide templates, detailed instructions, and even video guides to help with installation.
Pricing & Cost
- Q: How much do van flares cost?
A: Prices range from $1,500 to $2,500 per pair, depending on brand, features (window vs no window), and finish. - Q: What is the total cost including painting and installation?
A: After adding $600–$1,200 for painting and $500–$1,000 for installation, total costs typically range between $2,500 and $4,500. - Q: Are flares worth the investment?
A: Absolutely—if you plan to sleep sideways or want to maximize space, flares can dramatically improve comfort and usability. - Q: Why are some brands more expensive?
A: Higher-priced brands often use thicker fiberglass, more refined design, better flange fitment, and include trim or window options.
Functionality & Comfort
- Q: Can you sleep sideways in a van with flares?
A: Yes! Flares add about 10–12 inches of additional width, allowing people up to 6’4″ to sleep sideways across the van. - Q: How much space do flares add?
A: Most flares extend 5–6 inches on each side, for a total of 10–12 inches of added bed width. - Q: Are van flares insulated?
A: Some models come pre-insulated, while others require you to add insulation after installation. Sound-deadening and insulation are highly recommended. - Q: Can flares be used in winter?
A: Yes, with proper insulation and sealing, flares are suitable for all-season use, including cold climates.
Design Options
- Q: What are the differences between Flare Space and Van Speed flares?
A: Flare Space flares have a rounded, tapered design, while Van Speed capsules are more squared and easier to upholster. Van Speed flares often install more easily due to their wraparound flange. - Q: Can I get flares with or without windows?
A: Yes, most companies offer both windowed and blank (solid) versions. Some also sell vented or sliding window options. - Q: Are the flares symmetrical?
A: Not always. Some are shaped differently on the driver’s and passenger’s side to accommodate fuel doors or rear AC units. - Q: Do flares match the van’s body lines?
A: Some brands, like Van Speed, are specifically designed to blend with OEM lines. Others may look more aftermarket or require extra bodywork. - Q: Can I make DIY van flares for my Sprinter?
- A: Yes, but it’s very difficult and requires significant skill and time. If you mess up, trying to save money on DIY could easily cost you more in the long run.
Painting & Aesthetics
- Q: Do van flares come pre-painted?
A: Most do not. Flares usually come in raw fiberglass or primed gel coat. Painting is a separate step. - Q: How do I color match flares to my van?
A: The best way is to remove a panel and use a spectrometer for a perfect match. Paint codes are helpful but not always accurate. - Q: Can I wrap van flares?
A: Yes, vinyl wrapping is possible, but due to curves and edges, painting often looks cleaner and lasts longer.
Where to Buy
- Q: Who makes the best van flares in the US?
A: Popular and reputable brands include FlareSpace, Van Speed Shop, Tourig, Overland Van Project, and Fiberine. - Q: Where can I buy flares for Sprinter van?
A: You can buy Sprinter van flares (same as van bump out panels for other models) directly from manufacturers like Flarespace and Van Speed Shop, or through van conversion shops and online retailers that specialize in camper van parts. - Q: Can I buy flares online or do I need to visit a shop?
A: You can buy them online, but ensure you confirm the fitment and ask about shipping costs and lead times.
Maintenance & Quality
- Q: Are flares waterproof?
- A: Yes—if installed correctly using quality sealants and proper techniques. Improper installs may lead to leaks.
- Q: How durable are fiberglass flares?
A: Very durable. High-quality flares are made of marine-grade fiberglass that resists cracking and warping. - Q: What are flares made of (fiberglass vs plastic)?
A: Most high-quality flares are fiberglass; some low-cost or DIY versions may use ABS plastic. - Q: How do I prevent leaks
A: Use proper primer, adhesive, and sealant. Clamp or tape the flares securely during curing. Double-check all seals before finalizing.
Legal & Registration
- Q: Are van flares street legal?
A: Yes, flares are legal in all U.S. states. However, ensure they do not obscure required lighting or violate width regulations in your area. - Q: Do flares affect insurance or registration?
A: Usually no, but it’s wise to notify your insurance if you’re modifying your van for full-time use or resale value.
Other
- Q: Can I live in a van without flares?
- A: Yes, you can live in a van without flares, but flares give you more space to sleep sideways and make better use of the interior. They’re helpful, especially for taller people.
So, if you’re struggling with space in your van, or just want a really comfy bed, van flares are definitely something to look into. For me, the Van Speed capsules were the clear winner because of their look, easier installation, and lower cost. They truly changed my van life for the better!
Author

Our products
Beds
Mercedes Sprinter Van Murphy Bed
Beds
Ford Transit Van Murphy Bed
Beds
Ram Promaster Murphy Bed
Cabinets
Mercedes Sprinter Van Wheel Well Cabinets
Camper Van Cabinets
Ford Transit Van Wheel Well Cabinets
Cabinets
Ram Promaster Wheel Well Cabinets
Cabinets
Mercedes Sprinter Van Galley Cabinets
Camper Van Cabinets
Ford Transit Galley Cabinets
Posts you may like
Ford Transit vs Mercedes Sprinter reliability: side-by-side comparison
Feb
Van Flares Guide: What They Are, Why You Need Them, and How to Choose the Right Ones
May
Ford Transit Camper Conversion Kit for DIY Van: Top 15
Jan
How to put a bed in a Sprinter van
Feb
The 10 Best Vans for Van Life
Jun
How to build a DIY camper van in 1 week
Feb
Stealth van camping: Everything you need to know
Dec
Free Van Bed Plans and Ideas to Build a Bed in a Van
Feb